A Basic Primer in Using S5
For a newcomer, creating a presentation in S5 may seem a bit daunting at first. Don't panic! Writing your own presentation is very, very easy. In order to help smooth the way, here's a short primer on what to change and what to leave alone in an S5 presentation file.
First steps
First, download the S5 blank template archive. This is a 26KB ZIP archive that contains everything you'll need to create a basic slide show: the presentation file itself, the style sheets that make it look pretty, and the JavaScript that drives the actual slide showing (and hiding).
Once you've downloaded the archive and uncompressed it, you should find two things: a file named s5-blank.html and a folder (directory) called ui. Inside that folder are all the CSS and JavaScript bits that make the slide show work. We're not going to mess with those; if you want more information on them, see the file map, or ponder slide 7 of the introductory slide show. All we're going to do is edit the file s5-blank.html. Go ahead and load it up into your favorite editor, whether that's Dreamweaver, GoLive, Notepad, TopStyle, or BBEdit. I'll use BBEdit.
Boot to the head
The first part of the presentation file, at least the part after the DOCTYPE and the <html> tag, is the head element, shown in Figure 1.
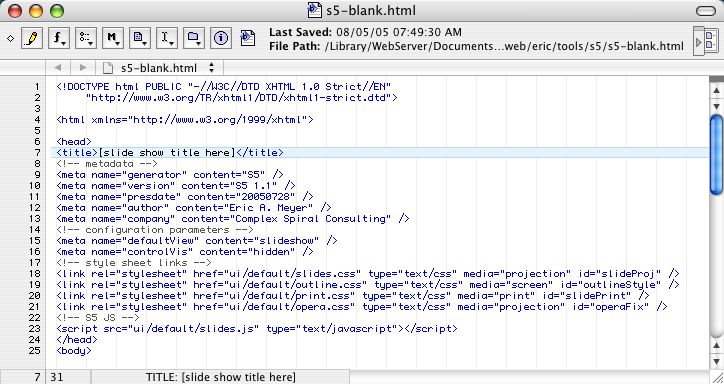 Figure 1. The first part of the presentation file.
For the most part, you shouldn't have to ever touch this part of the file. In fact, it's better to avoid it. If you changed any of the link elements, for example, you might break the slide show! So you'll want to just skip past it... except for one thing. See the title element? Change its contents from "[slide show title]" to the title of the slide show. So if you're doing a presentation on the benefits of respiration, you might call the slide show "Breathing Easy: Why Air Is Good For You". Go ahead and change the title contents to say that, as shown in Figure 2.
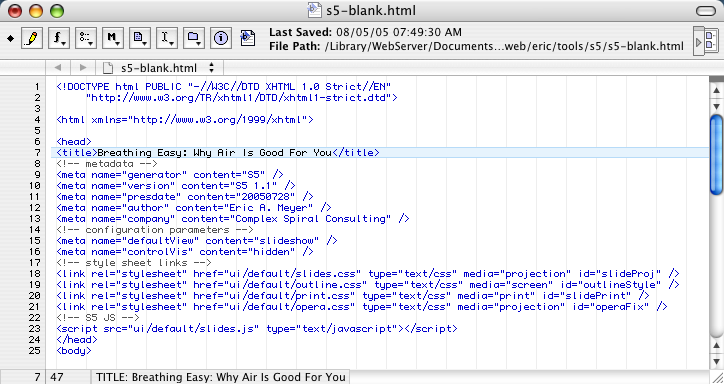 Figure 2. Filling in the title.
Other than that, you don't need to make any changes to this part of the file. Let's move on to the next part.
Slide headers and footers
If you move downward in the presentation file, you'll find a div with an id of layout. Inside that div are a number of slide components; these appear on every slide in the slide show. This is where we find things like the header, footer, slide controls, and so forth, as shown in Figure 3.
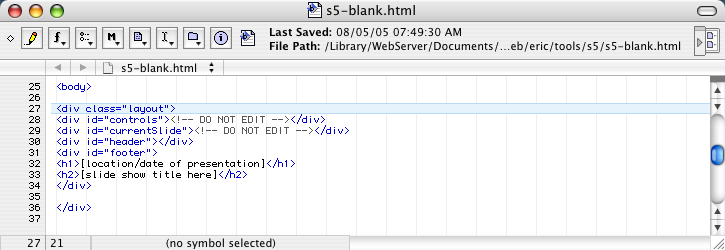 Figure 3. The header, footer, and other slide components.
There are really only two parts we need to worry about: the two sets of bracketed text. Replace the first one with "Anytown, USA • 1 August 2005". (Although you can certainly fill in today's date if you prefer; that just happens to be the date on which I updated this primer.) For the second bit, just fill in the slide show title. You can copy it from the title element at the top of the file, if you want to save some keystrokes.
A few words on the XHTML structures seen here. Many of them are necessary for the slide show to work, and should not be altered; an example is <div id="controls"></div>. Inside the header and footer, however, you can insert whatever XHTML and content you like. The only real restriction is that these are expected to be fairly small, because the larger the header and footer, and less space there will be for slide content. If you change the markup inside the header and footer, you may also have to modify the CSS files to handle whatever you put in there. We aren't going to get into all that now. Let's just leave things as-is and continue on to our first actual slide.
The title slide
Typically, the first slide in the slide show will be a title slide. This doesn't have to be the case, of course; you can just jump right into the slides without having a title card. Most people prefer having one, though. The template contains a typical title slide, which is highlighted in Figure 4.
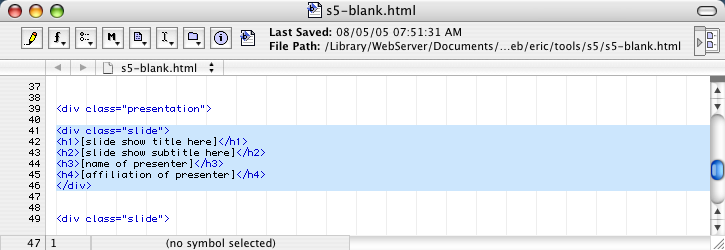 Figure 4. The first slide's markup.
XOXO Differences
If you're writing an XOXO-based slide show, the markup here will be a little different: the presentation div will be an ol with a different class value, and all the slides will be li elements. See the page Minimal S5+XOXO Structure for details.
So let's replace the bracketed text with our own information. For the slide show title and subtitle, let's actually break up the title we've been using into two parts: "Breathing Easy" and "Why Air Is Good For You". Fill in these bits for the title and subtitle, respectively. Then, for the author name and affiliation, use your own name and employer (or whatever affiliation you'd prefer to admit). I'll use my own name and affiliation in creating the figures, such as Figure 6.
Having done that, let's take a peek at how the slide show is going. Load the file s5-blank.html into a Web browser such as Firefox, Safari, or Internet Explorer. Those aren't the only browsers you can use; in general, if it was released in the 21st Century (by the Gregorian Calendar), then it's probably okay to use. You should immediately see the title slide appear. A scaled-down version appears in Figure 5, along with some highlight boxes.
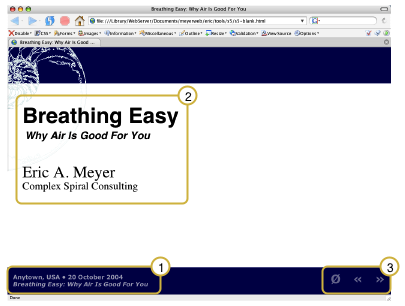 Figure 5. The title slide (annotated).
Box #1 marks the footer content, which was the first thing you edited in the slide show. Box #2 surrounds the content of the title slide, which you just now edited. Box #3 points out the slide controls, which are automatically created by the JavaScript when the presentation is loaded.
Pretty easy so far, eh? Just wait: it gets even easier.
Creating a slide
Again, move down in s5-slide.html. After the first slide, the one we made a title slide, you'll find another slide. It's shown in Figure 6.
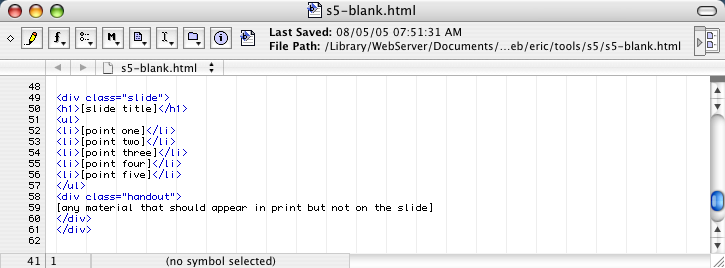 Figure 6. The first slide after the title slide.
At this point, you've probably figured out what to do. Just replace the bracketed text with your own content, and there you go: you have a slide. So the title might be "An Introduction to Air" and the five points would be various facts about air, or perhaps would be a preview summary of what the rest of the slide show will discuss. Since most slides are just a set of bullet points, using an unordered list is definitely the way to go. You can have a different number of points than five, of course, but remember that if the slide gets too long, content will disappear behind the footer.
Now, after the list, see the div with a class of handout? That's where you put any extra notes or information related to the slide content that should appear in printed handouts, but not go on the slide when it's given as a presentation. You could put URLs for more information, include code snippets, or anything else that would be useful to someone looking at the handout. If a slide doesn't have any handout material, you can delete the div, or else leave it in place but empty—it's up to you.
Go ahead and put something in the handout section for the current slide, then reload the presentation file in a Web browser. Once the title slide comes up, advance to the next slide by pressing the space bar on your keyboard (or hitting page down, right arrow, or down arrow; or by clicking the mouse button while the pointer is somewhere over the slide). You should see something like what's in Figure 7.
Get Keyed Up
For a complete listing of the keyboard controls in S5, see the Features page.
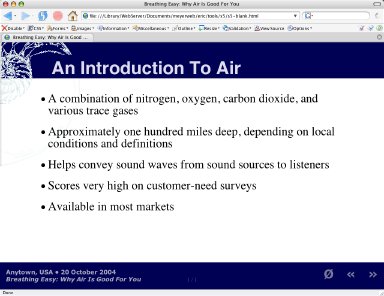 Figure 7. Viewing the new slide in a browser.
Notice that the handout material doesn't appear in the slide. If you were to print out s5-blank.html, though, it would show up at the end of this slide.
In order to create a new slide, you can either type in the markup to create a new one, or (more conveniently) copy the slide you just finished, paste it into the file after the last slide, and change the content. There is no defined limit to the number of slides in a given presentation, so you shouldn't have any problems with running out of space. (Your audience might have problems if you subject them to a 100-slide presentation, though.)
Miscellaneous Notes
- It isn't necessary to have every slide be a list of bullet points. You can instead drop in an image, a quote, or anything else that strikes you as useful. See slide 7 of "S5: An Introduction" for an example of how a large image might be included. Then advance to the next slide to see how several small images can be included. What you put into a slide, and how you structure it, is largely up to you.
- Remember that if a slide gets too long, content will disappear behind the footer! So if you're planning to project at 1024x768 and have an image that's 1000 pixels tall, it isn't going to fit on a slide (unless you scale it yourself). If you have too many points on a slide, consider breaking it up into two slides with the same title. You can also edit the CSS to make fonts smaller and adjust content spacing, if you like, but that isn't nearly as easy.
- On a related note, if you assume one resolution and then get another, things can go seriously awry. Be prepared to edit the CSS in such cases. (The usual workaround for this situation is to change the
font-sizeof thebodyelement, although in some browsers you can simply scale the text size from the keyboard.) - You don't have to leave the presentation file name as s5-blank.html. You can rename to anything you like, such as talk.html or preso.html.
- Changing the theme involves replacing the default files with new ones. Creating your own theme involves writing new style sheets. Both are more complex topics, best saved for another day.
In Summary
As you've seen in this quick primer, creating your own presentation is pretty simple. In the majority of cases, all you need is to have a short unordered list in each slide, but you can certainly include other kinds of material if you like.
Hopefully this primer has helped you get started creating your own presentation. If there's anything missing or unclear, please let me know.