Better Image Optimization by Restricting the Color Index
Published 6 years, 2 months pastLet’s talk about image optimization. There are a few images used in meyerweb’s new design, and while I wanted them to be pleasing to the eye, I also wanted them to be lightweight. My rough goal was to not have the design elements (images plus CSS) be more than half the total page weight for a typical blog post, not counting any post-specific images like photos or diagrams. Thus, if a typical blog post’s page weight was 500KB, I didn’t want the images and CSS to add up to more than 250KB or so.
Spoiler: I achieved my goal, but at the same time fell short. What I had overlooked was custom fonts, which I’ll get to in a later post.
I found out that how you optimize images matters a whole lot. Let’s consider one example: the spiral-like image (which, yes, is a quiet callback to past work) at the center of the previous-next links at the bottom of blog posts and archive pages. After I extracted a full-resolution copy of that particular sketch from pages 13-14 of Hamonshū, Vol. 1 and did a little cleanup with filters and so on, it became a 1.4MB Acorn file.

(Side note: Acorn’s “Transparentomatic” filter was an enormous time-saver on this project — it made dropping out the page texture a breeze, and easily adjustable, without forcing me to create and retouch mask layers and whatnot. Thanks, Flying Meat!)
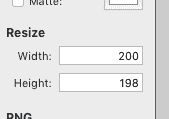
With the image ready to be tested in-browser, I would use Acorn’s Web Export dialog to save it as a PNG. The nice thing about this dialog is its built-in Resize feature, which let me keep the Acorn file at its native size (almost a thousand pixels on each side) and export it to the size I wanted — in this case, 200 pixels across. I did this sort of thing a lot, because I tested a variety of images for every design element.
Once I settled on the image I wanted, I’d drop it on ImageOptim to optimize it. This usually slammed all eight cores in my aged laptop’s CPU for a good few seconds, and resulted in up to 5% size savings.
That last paragraph probably looks like an indictment of ImageOptim, but wait! It’s fully redeemed by the end of the post, by which time I will have indicted myself instead.
At this point, my spiral image had gone from a 1.4MB Acorn file to a 30KB PNG. That’s pretty good, even if 30KB feels a tad bulky for a 200×200 image. I just assumed, what with all the transparency and shades of color and all that, it wasn’t too far out of line. But as the whole design started to come together, I discovered that when you added up all the illustration images on, say, the home page, I’d let image bloat sneak up on me in the worst way. They were totalling close to a megabyte, and they’d all been through ImageOptim already.
I went back to Acorn to see if I could squeeze any more out of the file size, maybe convert some of the images to JPGs if they didn’t need the transparency. As I flipped between file formats in the Web Export dialog, I noticed something I’d previously overlooked in the PNG export options: a bit depth slider. I’d been saving the PNGs with no bit depth restrictions, meaning the color table was holding space for 224 colors. That’s… a lot of colors, roughly 224 of which I wasn’t actually using.
When I clicked the “Index PNG Colors” checkbox and changed the slider until I started getting dithers or obvious color loss, then brought it up a notch or two, the difference was astounding. Instead of a 30KB file, I got a 4.4 KB file. Instead of saving at 75% the original size, it was now 11%.
So I went back through the directory with all my design elements and repeated the process. I do have batch image processing software installed, but I elected to do this manually so I could pick the best color depth for each file by eye. It could be that some would be okay at 4 colors instead of 8; others might need 16 or 32 to retain visual fidelity. Fortunately for me, I only had a couple dozen images to go through, but it would have been worth it even at 10 times that many.
Once I’d gone through all the images and saved them with restricted color depth, my theme’s image directory was down to 242KB total. The biggest of them, the separator wave illustrations, had gone from being ~150KB each to ~25KB each — all five of them together now totalled less than just one of them had before I did the color indexing.
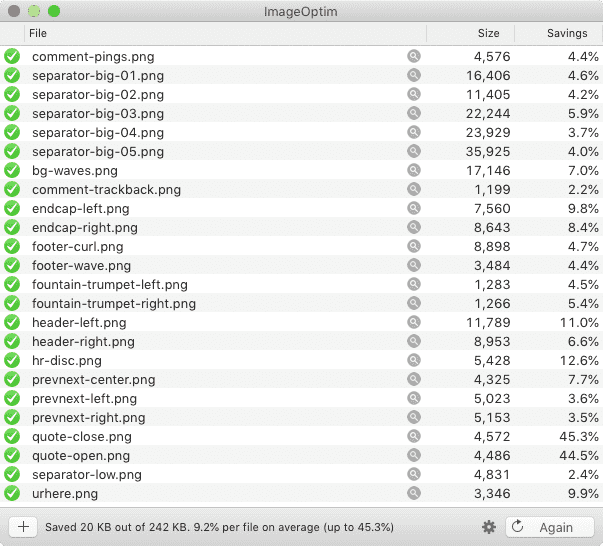
At this point, I thought, “All right, let’s see what ImageOptim does with these.” It squeezed them down even further, taking my total from 242KB to 222KB, a nine percent reduction. Which is to say, the percentage savings I got on these already-small files was larger than I’d been getting on the much bigger files — plus, ImageOptim processed them quickly and with a minimum of CPU slamming. Which is honestly pretty great, given the age of my laptop (about seven years).
So: did I meet my performance goal? As I said at the outset, yes, but also no. For a single blog post with around 10KB of text content and no embedded media, the page weight is around 460KB, with the size varying a bit depending on how much markup is needed for the 10KB of text. (Here’s one recent example with some content variety.) Of that, the CSS, split across two files, totals 35.2KB. The images add up to 102.9KB. Add them together, and you get just a hair over 138KB, or right around 30%. Huge success!
Except I hadn’t factored in custom fonts, which all by themselves currently total 203.6KB (44% total page weight), mostly due to the three faces of IM Fell I’m using. That’s right: The fonts weigh more than the CSS and images put together. Once they’re added in with the CSS and images, the design elements end up being almost 75% the total page weight — about 341.6KB of the 460KB total. Most of the rest is the 104.4KB chewed up by showdown.js, the enhancement script I’m using to allow the use of Markdown in post comments.
Thus, next up on my performance quest is looking into subsetting the fonts I’m using in order to get their weight down, and finding out if there’s anything I can do to subset Showdown as well.
But as of now, I’m well pleased with where I ended up on image optimization. I just need to go back and do the same for post-specific images I’d left at unrestricted color depths, where I anticipate a similar 90% savings in file sizes. If you’ve got a lot of images, particularly PNGs, try running them through a process that lets you restrict the color depth, and see how much it saves. The results might surprise you!
Comments (2)
I’m wondering if ImageAlpha might help bring the file size of PNGs even further. I usually run PNGs through it first and then ImageOptim.
i like to use https://tinypng.com/ for reducing image file sizes quickly.
Manually adjusting PNG index colors is probably better some times, but the ease of use and availability of tinypng is very helpful for me.