Posts in the Web Category

Masked Gradient Dashed Lines

Published 2 years, 3 weeks past

I talked in my last post about how I used linear gradients to recreate dashed lines for the navlinks and navbar of wpewebkit.org, but that wasn’t the last instance of dashing gradients in the design.  I had occasion to use that technique again, except this time as a way to create a gradient dash.  I mean, a dashed line that has a visible gradient from one color to another, as well as a dashed line that’s constructed using a linear gradient.  Only this time, the dashed gradient is used to create the gaps, not the dashes.

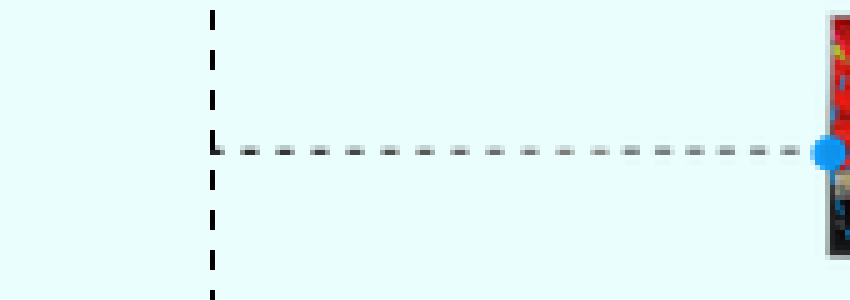
To set the stage, here’s the bit of the design I had to create:

Design!

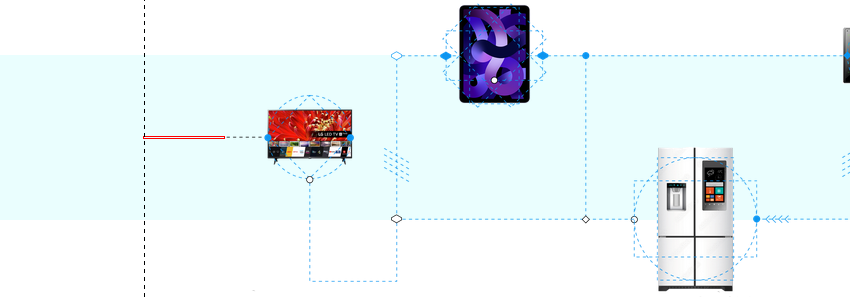
The vertical dashed line down the left side of the design is a dashed linear gradient, but that’s not actually relevant.  It could have been a dashed border style, or an SVG, or really anything.  And that image on the right is a PNG, but that’s also not really relevant.  What’s relevant is I had to make sure the image was centered in the content column, and yet its dashed line connected to the left-side dashed line, regardless of where the image landed in the actual content.

Furthermore, the colors of the two dashed lines were different at the point I was doing the implementation: the left-side line was flat black, and the line in the image was more of a dark gray.  I could have just connected a dark gray line to the black, but it didn’t look right.  A color transition was needed, while still being a dashed line.

Ideally, I was looking for a solution that would allow a smooth color fade over the connecting line’s length while also allowing the page background color to show through.  Because the page background might sometimes be white and sometimes be a light blue and might in the future be lime green wavy pattern or something, who knows.

So I used a dashed linear gradient as a mask.  The CSS goes like this:

.banner::before {
	content: '';
	position: absolute;
	top: 50%;
	left: -5rem;
	width: 5rem;
	height: 1px;
	background: linear-gradient(90deg, #222, #888);
	mask-image: repeating-linear-gradient(
		270deg, transparent, #999 1px 3px, transparent 4px 7px);
}

Please allow me to break it down a step at a time.

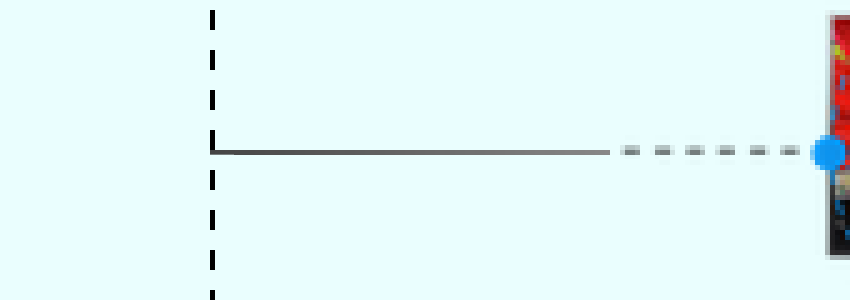
First, there’s the positioning of the pseudo-element, reaching leftward 5rem from the left edge of the content column, which here I’ve annotated with a red outline. (I prefer outlines to borders because outlines don’t participate in layout, so they can’t shift things around.)

.banner::before {
	content: '';
	position: absolute;
	top: 50%;
	left: -5rem;
	width: 5rem;
	height: 1px;
}
The very skinny-short red box is where the connecting line needs to be drawn.

To that pseudo-element, I added a 90-degree-pointing linear gradient from black to gray to its background.

	…
	background: linear-gradient(90deg, #222, #888);
}
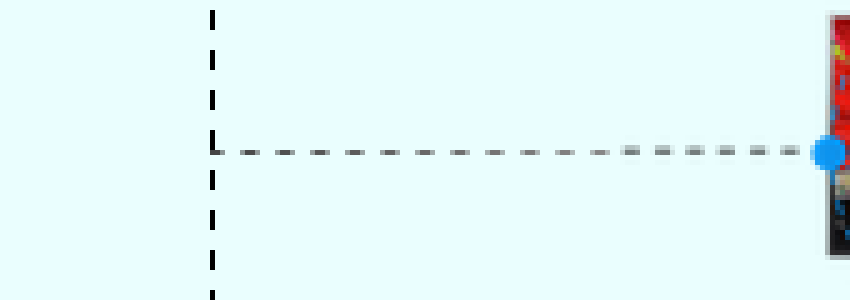
The gradient filling the entire background of the pseudo-element.

The pseudo-element does happen to touch the end of one of the vertical dashes, but that’s purely by coincidence.  It could have landed anywhere, including between two dashes.

So now it was time for a mask.  CSS Masks are images used to hide parts of an element based on the contents of the masking image, usually its alpha channel. (Using luminosity to define transparency levels via the mask-mode property is also an option, but Chrome doesn’t support that as yet.)  For example, you can use small images to clip off the corners of an element.

In this case, I defined a repeating linear gradient because I knew what size the dashes should be, and I didn’t want to mess with mask-size and mask-repeat (ironically enough, as you’ll see in a bit).  This way, the mask is 100% the size of the element’s box, and I just need to repeat the gradient pattern however many times are necessary to cross the entire width of the element’s background.

Given the design constraints, I wanted the dash pattern to start from the right side, the one next to the image, and repeat leftward, to ensure that the dash pattern would look unbroken.  Thus I set its direction to be 270 degrees.  Here I’ll have it alternate between red and transparent, because the actual color used for the opaque parts of the mask doesn’t matter, only its opacity:

	…
	mask-image: repeating-linear-gradient(
		270deg, transparent, red 1px 3px, transparent 4px 7px);
}
The pseudo-element being masked over and over again to create a dashed line that allows the backdrop to show through.

The way the mask works, the transparent parts of the masking image cause the corresponding parts of the element to be transparent  —  to be clipped away, in effect.  The opaque parts, whatever color they actually have, cause the corresponding parts of the element to be drawn.  Thus, the parts of the background’s black-to-gray gradient that line up with the opaque parts of the mask are rendered, and the rest of the gradient is not.  Thus, a color-fading dashed line.

This is actually why I separated the ends of the color stops by a pixel: by defining a one-pixel distance for the transition from transparent to opaque (and vice versa), the browser fills those pixels in with something partway between those two states.  It’s probably 50% opaque, but that’s really up to the browser.

The pixels of the repeating gradient pattern, shown here in the reading order of the CSS value.  In practice, this pattern is flipped horizontally, since its gradient arrow points to 270 degrees (leftward).

The result is a softening effect, which matches well with the dashed line in the image itself and doesn’t look out of place when it meets up with the left-hand vertical dashed line.

At least, everything I just showed you is what happens in Firefox, which proudly supports all the masking properties.  In Chromium and WebKit browsers, you need vendor prefixes for masking to work.  So here’s how the CSS turned out:

.banner::before {
	content: '';
	position: absolute;
	top: 50%;
	left: -5rem;
	width: 5rem;
	height: 1px;
	background: linear-gradient(90deg, #222, #888);
	-webkit-mask-image: repeating-linear-gradient(
		270deg, transparent, red 1px 3px, transparent 4px 7px);
	mask-image: repeating-linear-gradient(
		270deg, transparent, red 1px 3px, transparent 4px 7px);
}

And that’s where we were at launch.

It still bugged me a little, though, because the dashes I created were one pixel tall, but the dashes in the image weren’t.  They were more like a pixel and a half tall once you take the aliasing into account, so they probably started out 2 (or more)  pixels tall and then got scaled down.  The transition from those visually-slightly-larger dashes to the crisply-one-pixel-tall pseudo-element didn’t look quite right.

I’d hoped that just increasing the height of the pseudo-element to 2px would work, but that made the line look too thick.  That meant I’d have to basically recreate the aliasing myself.

At first I considered leaving the mask as it was and setting up two linear gradients, the existing one on the bottom and a lighter one on top.  Instead, I chose to keep the single background gradient and set up two masks, the original on the bottom and a more transparent one on top.  Which meant I’d have to size and place them, and keep them from tiling.  So, despite my earlier avoidance, I had to mess with mask sizing and repeating anyway.

mask-image:
	repeating-linear-gradient(
		270deg, transparent, #89A4 1px 3px, transparent 4px 7px),
	repeating-linear-gradient(
		270deg, transparent, #89A 1px 3px, transparent 4px 7px);
	mask-size: 100% 1px;
	mask-repeat: no-repeat;
	mask-position: 100% 0%, 100% 100%;
Two masks, one effect.

And that’s how it stands as of today.

In the end, this general technique is pretty much infinitely adaptable, in that you could define any dash pattern you like and have it repeat over a gradient, background image, or even just a plain background color.  It could be used to break up an element containing text, so it looks like the text has been projected onto a thick dashed line, or put some diagonal slashes through text, or an image, or a combination.

SLASHED TEXT
No PNG, no SVG, just text and CSS.

Or use a tiled radial gradient to make your own dotted line, one that’s fully responsive without ever clipping a dot partway through.  Wacky line patterns with tiled, repeated conic gradients?  Sure, why not?

The point being, masks let you break up the rectangularity of elements, which can go a long way toward making designs feel more alive.  Give ’em a try and see what you come up with!


A Dashing Navbar Solution

Published 2 years, 1 month past

One of the many things Igalia does is maintain an official port of WebKit for embedded devices called WPE WebKit, and as you might expect, it has a web site.  The design had gotten a little stale since its launch a few years ago, so we asked Denis Radenković at 38one to come up with a new design, which we launched yesterday.  And I got to turn it into HTML and CSS!  Which was mostly normal stuff, margins and font sizing and all that, but also had some bits that called for some creativity.

There was one aspect of the design that I honestly thought wasn’t going to be possible, which was the way the “current page” link in the site navbar connected up to the rest of the page’s design via a dashed line. You can see it on the site, or in this animation about how each navlink was designed to appear.

Navigation link styles, not including the Home button, which is essentially the same but not nearly as obvious because of its specific layout.

I thought about using bog-standard dashed element borders: one on a filler element or pseudo-element that spanned the mostly-empty left side of the navbar, and one on each navlink before the current one, and then… I don’t know. I didn’t get that far, because I realized the dashed borders would almost certainly stutter, visually. What I mean is, the dashes wouldn’t follow a regular on-off pattern, which would look fairly broken.

My next thought was to figure out how to size a filler element or pseudo-element so that it was the exact width needed to reach the middle of the active navlink. Maybe there’s a clever way to do that with just HTML and CSS, but I couldn’t think of a way to do it that wasn’t either structurally nauseating or dependent on me writing clever JavaScript. So I tossed that idea, though I’ll return to it at the end of the post.

In the end, it was the interim development styles that eventually got me there. See, while building out other parts of the design, I just threw a dashed border on the bottom of the navbar, which (as is the way of borders) spanned its entire bottom edge. At some point I glanced up at it and thought, If only I could figure out a mask that would clip off the part of the border I don’t need. And slowly, I realized that with a little coding sleight-of-hand, I could almost exactly do that.

First, I removed the bottom border from the navbar and replaced it with a dashed linear gradient background, like this:

nav.global {
	background-image: linear-gradient(
		90deg,
		currentColor 25%,
		transparent 25% 75%,
		currentColor 75%
	);
	background-position: 0 100%;
	background-size: 8px 1px;
	background-repeat: repeat-x;
}

(Okay, I actually used the background shorthand form of the above — linear-gradient(…) 0 100% / 8px 1px repeat-x — but the result is the same.)

I thought about using repeating-linear-gradient, which would have let me skip having to declare a background-repeat, but would have required me to size the gradient’s color stops using length units instead of percentages. I liked how, with the above, I could set the color stops with percentages, and then experiment with the size of the image using background-size. (7px 1px? 9px 1px? 8px 1.33px? Tried ’em all, and then some.) But that’s mostly a personal preference, not based in any obvious performance or clarity win, so if you want to try this with a repeating gradient, go for it.

But wait. What was the point of recreating the border’s built-in dash effect with a gradient background? Well, as I said, it made it easier to experiment with different sizes. It also allowed me to create a dash pattern that would be very consistent across browsers, which border-style dashes very much are not.

But primarily, I wanted the dashes to be in the background of the navbar because I could then add small solid-color gradients to the backgrounds of the navlinks that come after the active one.

nav.global li.currentPage ~ li {
	background: linear-gradient(0deg, #FFF 2px, transparent 2px);
}

That selects all the following-sibling list items of the currentPage-classed list item, which here is the “Learn & Discover” link.

<ul class="about off">
	<li><a class="nav-link" href="…">Home</a></li>
	<li class="currentPage"><a class="nav-link" href="…">Learn &amp; Discover</a></li>
	<li><a class="nav-link" href="…">Blog</a></li>
	<li><a class="nav-link" href="…">Developers</a></li>
	<li><a class="btn cta" href="…">Get Started</a></li>
</ul>

Here’s the result, with the gradient set to be visible with a pinkish fill instead of #FFF so we can see it:

The “masking” gradients, here set to be a nicely rosy pink instead of the usual solid white.

You can see how the pink hides the dashes. In the actual styles, because the #FFF is the same as the design’s page background, those list items’ background gradients are placed over top of (and thus hide) the navbar’s background dash.

I should point out that the color stop on the white solid gradient could have been at 1px rather than 2px and still worked, but I decided to give myself a little bit of extra coverage, just for peace of mind. I should also point out that I didn’t just fill the backgrounds of the list items with background-color: #FFF because the navbar has a semitransparent white background fill and a blurring background-filter, so the page content can be hazily visible through the navbar, as shown here.

The backdrop-blurring of content behind the navbar, not blurring nearly as much as I thought they should, but oh well.

The white line is slightly suboptimal in this situation, but it doesn’t really stand out and does add a tiny bit of visual accent to the navbar’s edge, so I was willing to go with it.

The next step was a little trickier: there needs to be a vertical dashed line “connecting” to the navbar’s dashed line at the horizontal center of the link, and also the navbar’s dashed line needs to be hidden, but only to the right of the vertical dashed line. I thought about doing two background gradients on the list item, one for the vertical dashed line and one for the white “mask”, but I realized that constraining the vertical dashed line to be half the height of the list item while also getting the repeating pattern correct was too much for my brain to figure out.

Instead, I positioned and sized a generated pseudo-element like this:

nav.global ul li.currentPage {
	position: relative;
}
nav.global ul li.currentPage::before {
	content: '';
	position: absolute;
	z-index: 1;
	top: 50%;
	bottom: 0;
	left: 50%;
	right: 0;
	background:
		linear-gradient(180deg,
			currentColor 25%,
			transparent 25% 75%, 
			currentColor 75%) 0 0 / 1px 8px repeat-y, 
		linear-gradient(0deg, #FFFF 2px, transparent 2px);
	background-size: 1px 0.5em, auto;
}

That has the generated pseudo-element fill the bottom right quadrant of the active link’s list item, with a vertical dashed linear gradient running along its left edge and a solid white two-pixel gradient along its bottom edge, with the solid white below the vertical dash. Here it is, with the background pinkishly filled in to be visible behind the two gradients.

That’s the ::before with its background filled in a rosy pink instead of the usual transparency.

With that handled, the last step was to add the dash across the bottom of the current-page link and then mask the vertical line with a background color, like so:

nav.global ul li.currentPage a {
	position: relative;
	z-index: 2;
	background: var(--dashH); /* converted the dashes to variables */
	background-size: 0.5em 1px;
	background-position: 50% 100%;
	background-color: #FFF;
}

And that was it. Now, any of the navbar links can be flagged as the current page (with a class of currentPage on the enclosing list item) and will automatically link up with the dashes across the bottom of the navbar, with the remainder of that navbar dash hidden by the various solid white gradient background images.

An animation of the link styles, only now you know how they work.

So, it’s kind of a hack, and I wish there were a cleaner way to do this. And maybe there is! I pondered setting up a fine-grained grid and adding an SVG with a dashed path, or maybe a filler <span>, to join the current link to the line. That also feels like a hack, but maybe less of one. Or maybe not!

What I believe I want are the capabilities promised by the Anchored Positioning proposal. I think I could have done something like:

nav.global {position: relative;}
nav.global .currentPage {anchor-name: --navLink;}
nav.global::before {
	position: absolute;
	left: 0;
	bottom: 0;
	right: var(--center);
	--center: anchor(--navLink 50%);
	top: anchor(--navLink bottom);
}

…and then used that to run the dashed line over from the left side of the page to underneath the midpoint of the current link, and then up to the bottom edge of that link. Which would have done away with the need for the li ~ li overlaid-background hack, and nearly all the other hackery. I mean, I enjoy hackery as much as the next codemonaut, but I’m happier when the hacks are more elegant and minimal.


Table Column Alignment with Variable Transforms

Published 2 years, 3 months past

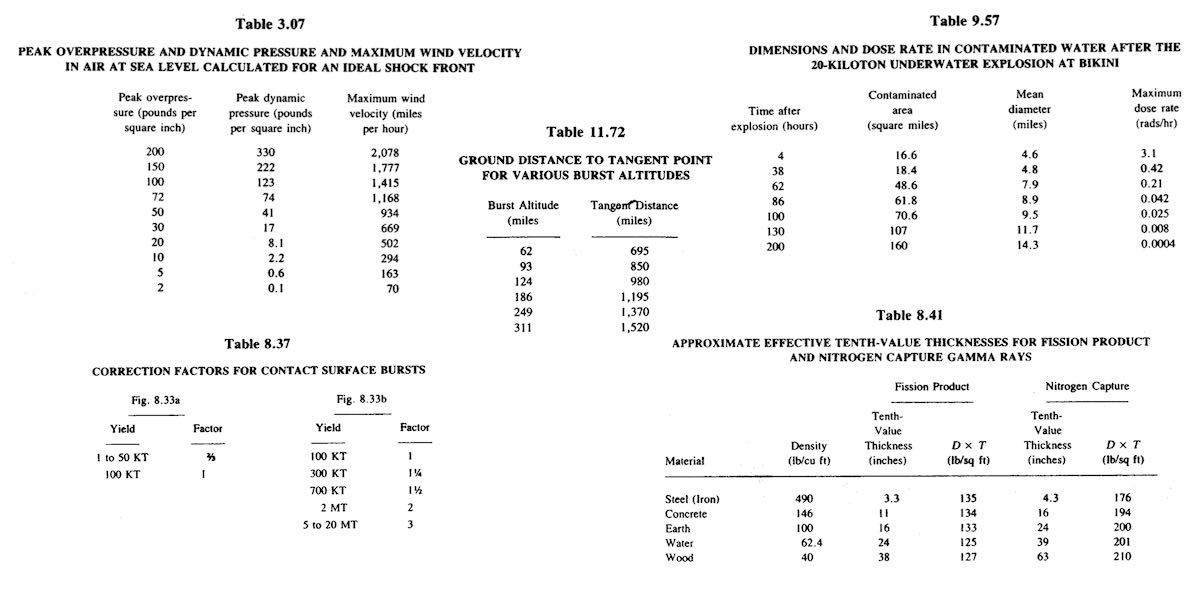
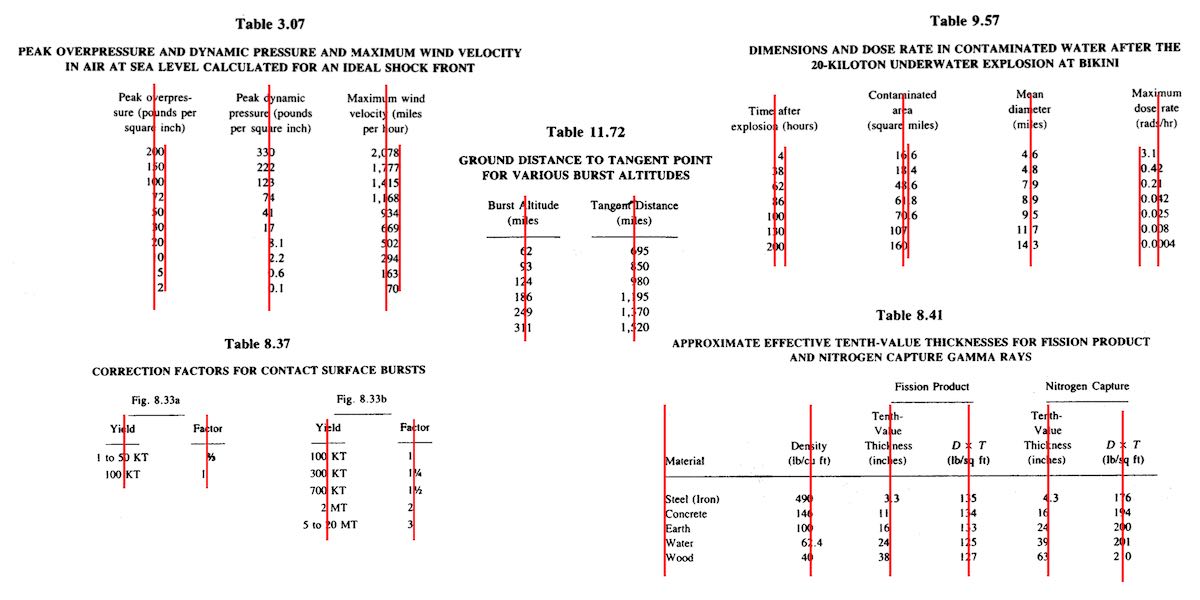
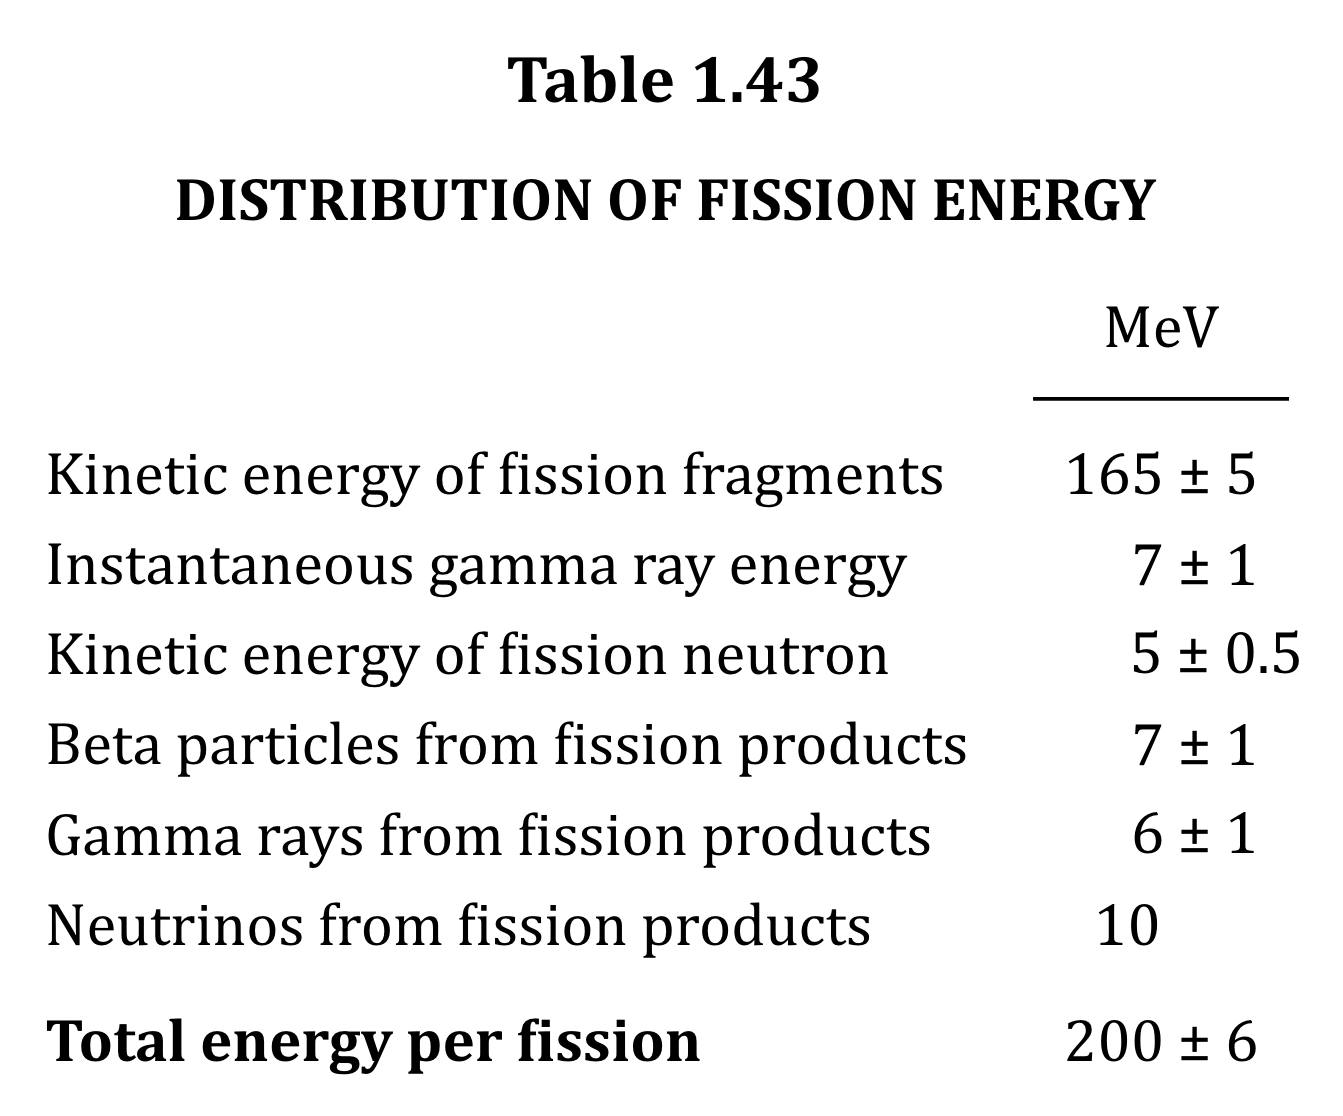
One of the bigger challenges of recreating The Effects of Nuclear Weapons for the Web was its tables.  It was easy enough to turn tab-separated text and numbers into table markup, but the column alignment almost broke me.

To illustrate what I mean, here are just a few examples of columns that had to be aligned.

A few of the many tables in the book and their fascinating column alignments.  (Hover/focus this figure to start a cyclic animation fading some alignment lines in and out. Sorry if that doesn’t work for you, mobile readers.)

At first I naïvely thought, “No worries, I can right- or left-align most of these columns and figure out the rest later.”  But then I looked at the centered column headings, and how the column contents were essentially centered on the headings while having their own internal horizontal alignment logic, and realized all my dreams of simple fixes were naught but ashes.

My next thought was to put blank spacer columns between the columns of visible content, since table layout doesn’t honor the gap property, and then set a fixed width for various columns.  I really didn’t like all the empty-cell spam that would require, even with liberal application of the rowspan attribute, and it felt overly fragile  —  any shifts in font face (say, on an older or niche system) might cause layout upset within the visible columns, such as wrapping content that shouldn’t be wrapped or content overlapping other content.  I felt like there was a better answer.

I also thought about segregating every number and symbol (including decimal separators) into separate columns, like this:

<tr>
  <th>Neutrinos from fission products</th>
  <td>10</td> 
  <td></td>
  <td></td>
</tr>
<tr class="total">
  <th>Total energy per fission</th>
  <td>200</td>
  <td>±</td>
  <td>6</td>
</tr>

Then I contemplated what that would do to screen readers and the document structure in general, and after the nausea subsided, I decided to look elsewhere.

It was at that point I thought about using spacer <span>s.  Like, anywhere I needed some space next to text in order to move it to one side or the other, I’d throw in something like one of these:

<span class="spacer"></span>
<span style="display: inline; width: 2ch;"></span>

Again, the markup spam repulsed me, but there was the kernel of an idea in there… and when I combined it with the truism “CSS doesn’t care what you expect elements to look or act like”, I’d hit upon my solution.

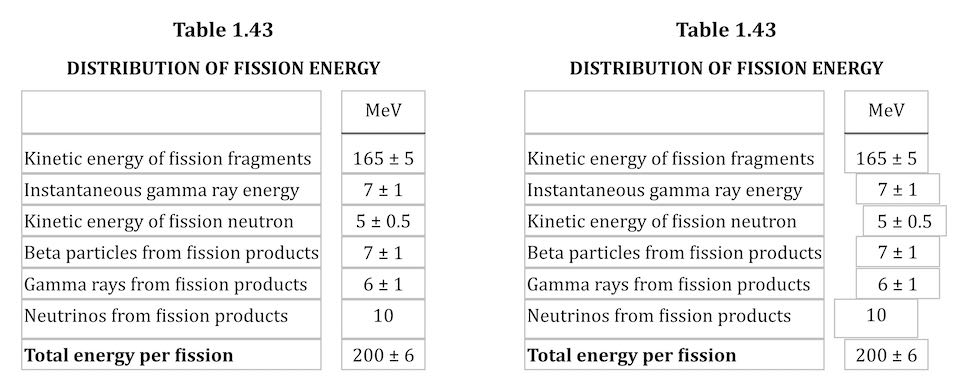
Let’s return to Table 1.43, which I used as an illustration in the announcement post.  It’s shown here in its not-aligned and aligned states, with borders added to the table-cell elements.

Table 1.43 before and after the cells are shifted to make their contents visually align.

This is exactly the same table, only with cells shifted to one side or another in the second case.  To make this happen, I first set up a series of CSS rules:

figure.table .lp1 {transform: translateX(0.5ch);}
figure.table .lp2 {transform: translateX(1ch);}
figure.table .lp3 {transform: translateX(1.5ch);}
figure.table .lp4 {transform: translateX(2ch);}
figure.table .lp5 {transform: translateX(2.5ch);}

figure.table .rp1 {transform: translateX(-0.5ch);}
figure.table .rp2 {transform: translateX(-1ch);}

For a given class, the table cell is translated along the X axis by the declared number of ch units.  Yes, that means the table cells sharing a column no longer actually sit in the column.  No, I don’t care — and neither, as I said, does CSS.

I chose the labels lp and rp for “left pad” and “right pad”, in part as a callback to the left-pad debacle of yore even though it has basically nothing to do with what I’m doing here.  (Many of my class names are private jokes to myself.  We take our pleasures where we can.)  The number in each class name represents the number of “characters” to pad, which here increment by half-ch measures.  Since I was trying to move things by characters, using the unit that looks like it’s a character measure (even though it really isn’t) made sense to me.

With those rules set up, I could add simple classes to table cells that needed to be shifted, like so:

<td class="lp3">5 ± 0.5</td>

<td class="rp2">10</td>

That was most of the solution, but it turned out to not be quite enough.  See, things like decimal places and commas aren’t as wide as the numbers surrounding them, and sometimes that was enough to prevent a specific cell from being able to line up with the rest of its column.  There were also situations where the data cells could all be aligned with each other, but were unacceptably offset from the column header, which was nearly always centered.

So I decided to calc() the crap out of this to add the flexibility a custom property can provide.  First, I set a sitewide variable:

body {
	--offset: 0ch;
}

I then added that variable to the various transforms:

figure.table .lp1 {transform: translateX(calc(0.5ch + var(--offset)));}
figure.table .lp2 {transform: translateX(calc(1ch   + var(--offset)));}
figure.table .lp3 {transform: translateX(calc(1.5ch + var(--offset)));}
figure.table .lp4 {transform: translateX(calc(2ch   + var(--offset)));}
figure.table .lp5 {transform: translateX(calc(2.5ch + var(--offset)));}

figure.table .rp1 {transform: translateX(calc(-0.5ch + var(--offset)));}
figure.table .rp2 {transform: translateX(calc(-1ch   + var(--offset)));}

Why use a variable at all?  Because it allows me to define offsets specific to a given table, or even specific to certain table cells within a table.  Consider the styles embedded along with Table 3.66:

#tbl3-66 tbody tr:first-child td:nth-child(1),
#tbl3-66 tbody td:nth-child(7) {
	--offset: 0.25ch;
}
#tbl3-66 tbody td:nth-child(4) {
	--offset: 0.1ch;	
}

Yeah. The first cell of the first row and the seventh cell of every row in the table body needed to be shoved over an extra quarter-ch, and the fourth cell in every table-body row (under the heading “Sp”) got a tenth-ch nudge.  You can judge the results for yourself.

So, in the end, I needed only sprinkle class names around table markup where needed, and add a little extra offset via a custom property that I could scope to exactly where needed.  Sure, the whole setup is hackier than a panel of professional political pundits, but it works, and to my mind, it beats the alternatives.

I’d have been a lot happier if I could have aligned some of the columns on a specific character.  I think I still would have needed the left- and right-pad approach, but there were a lot of columns where I could have reduced or eliminated all the classes.  A quarter-century ago, HTML 4 had this capability, in that you could write:

<COLGROUP>
	<COL>
	<COL>
	<COL align="±">
</COLGROUP>

CSS2 was also given this power via text-align, where you could give it a string value in order to specify horizontal alignment.

But browsers never really supported these features, even if some of them do still have bugs open on the issue.  (I chuckle aridly every time I go there and see “Opened 24 years ago” a few lines above “Status: NEW”.)  I know it’s not top of anybody’s wish list, but I wouldn’t mind seeing that capability return, somehow. Maybe as something that could be used in Grid column tracks as well as table columns.

I also found myself really pining for the ability to use attr() here, which would have allowed me to drop the classes and use data-* attributes on the table cells to say how far to shift them.  I could even have dropped the offset variable.  Instead, it could have looked something like this:

<td data-pad="3.25">5 ± 0.5</td>

<td data-pad="-1.9">10</td>

figure.table *[data-pad] {transform: translateX(attr(data-pad,'ch'));}

Alas, attr() is confined to the content property, and the idea of letting it be used more widely remains unrealized.

Anyway, that was my journey into recreating mid-20th-Century table column alignment on the Web.  It’s true that sufficiently old browsers won’t get the fancy alignment due to not supporting custom properties or calc(), but the data will all still be there.  It just won’t have the very specific column alignment, that’s all.  Hooray for progressive enhancement!


Recreating “The Effects of Nuclear Weapons” for the Web

Published 2 years, 3 months past

In my previous post, I wrote about a way to center elements based on their content, without forcing the element to be a specific width, while preserving the interior text alignment.  In this post, I’d like to talk about why I developed that technique.

Near the beginning of this year, fellow Web nerd and nuclear history buff Chris Griffith mentioned a project to put an entire book online: The Effects of Nuclear Weapons by Samuel Glasstone and Philip J. Dolan, specifically the third (1977) edition.  Like Chris, I own a physical copy of this book, and in fact, the information and tools therein were critical to the creation of HYDEsim, way back in the Aughts.  I acquired it while in pursuit of my degree in History, for which I studied the Cold War and the policy effects of the nuclear arms race, from the first bombers to the Strategic Defense Initiative.

I was immediately intrigued by the idea and volunteered my technical services, which Chris accepted.  So we started taking the OCR output of a PDF scan of the book, cleaning up the myriad errors, re-typing the bits the OCR mangled too badly to just clean up, structuring it all with HTML, converting figures to PNGs and photos to JPGs, and styling the whole thing for publication, working after hours and in odd down times to bring this historical document to the Web in a widely accessible form.  The result of all that work is now online.

That linked page is the best example of the technique I wrote about in the aforementioned previous post: as a Table of Contents, none of the lines actually get long enough to wrap.  Rather than figuring out the exact length of the longest line and centering based on that, I just let CSS do the work for me.

There were a number of other things I invented (probably re-invented) as we progressed.  Footnotes appear at the bottom of pages when the footnote number is activated through the use of the :target pseudo-class and some fixed positioning.  It’s not completely where I wanted it to be, but I think the rest will require JS to pull off, and my aim was to keep the scripting to an absolute minimum.

LaTeX and MathJax made writing and rendering this sort of thing very easy.

I couldn’t keep the scripting to zero, because we decided early on to use MathJax for the many formulas and other mathematical expressions found throughout the text.  I’d never written LaTeX before, and was very quickly impressed by how compact and yet powerful the syntax is.

Over time, I do hope to replace the MathJax-parsed LaTeX with raw MathML for both accessibility and project-weight reasons, but as of this writing, Chromium lacks even halfway-decent MathML support, so we went with the more widely-supported solution.  (My colleague Frédéric Wang at Igalia is pushing hard to fix this sorry state of affairs in Chromium, so I do have hopes for a migration to MathML… some day.)

The figures (as distinct from the photos) throughout the text presented an interesting challenge.  To look at them, you’d think SVG would be the ideal image format. Had they come as vector images, I’d agree, but they’re raster scans.  I tried recreating one or two in hand-crafted SVG and quickly determined the effort to create each was significant, and really only worked for the figures that weren’t charts, graphs, or other presentations of data.  For anything that was a chart or graph, the risk of introducing inaccuracies was too high, and again, each would have required an inordinate amount of effort to get even close to correct.  That’s particularly true considering that without knowing what font face was being used for the text labels in the figures, they’d have to be recreated with paths or polygons or whatever, driving the cost-to-recreate astronomically higher.

So I made the figures PNGs that are mostly transparent, except for the places where there was ink on the paper.  After any necessary straightening and some imperfection cleanup in Acorn, I then ran the PNGs through the color-index optimization process I wrote about back in 2020, which got them down to an average of 75 kilobytes each, ranging from 443KB down to 7KB.

At the 11th hour, still secretly hoping for a magic win, I ran them all through svgco.de to see if we could get automated savings.  Of the 161 figures, exactly eight of them were made smaller, which is not a huge surprise, given the source material.  So, I saved those eight for possible future updates and plowed ahead with the optimized PNGs.  Will I return to this again in the future?  Probably.  It bugs me that the figures could be better, and yet aren’t.

It also bugs me that we didn’t get all of the figures and photos fully described in alt text.  I did write up alternative text for the figures in Chapter I, and a few of the photos have semi-decent captions, but this was something we didn’t see all the way through, and like I say, that bugs me.  If it also bugs you, please feel free to fork the repository and submit a pull request with good alt text.  Or, if you prefer, you could open an issue and include your suggested alt text that way.  By the image, by the section, by the chapter: whatever you can contribute would be appreciated.

Those image captions, by the way?  In the printed text, they’re laid out as a label (e.g., “Figure 1.02”) and then the caption text follows.  But when the text wraps, it doesn’t wrap below the label.  Instead, it wraps in its own self-contained block instead, with the text fully justified except for the last line, which is centered.  Centered!  So I set up the markup and CSS like this:

<figure>
	<img src="…" alt="…" loading="lazy">
	<figcaption>
		<span>Figure 1.02.</span> <span>Effects of a nuclear explosion.</span>
	</figcaption>
</figure>
figure figcaption {
	display: grid;
	grid-template-columns: max-content auto;
	gap: 0.75em;
	justify-content: center;
	text-align: justify;
	text-align-last: center;
}

Oh CSS Grid, how I adore thee.  And you too, CSS box alignment.  You made this little bit of historical recreation so easy, it felt like cheating.

Look at the way it’s all supposed to line up on the ± and one number doesn’t even have a ± and that decimal is just hanging out there in space like it’s no big deal.  LOOK AT IT.

Some other things weren’t easy.  The data tables, for example, have a tendency to align columns on the decimal place, even when most but not all of the numbers are integers.  Long, long ago, it was proposed that text-align be allowed a string value, something like text-align: '.', which you could then apply to a table column and have everything line up on that character.  For a variety of reasons, this was never implemented, a fact which frosts my windows to this day.  In general, I mean, though particularly so for this project.  The lack of it made keeping the presentation historically accurate a right pain, one I may get around to writing about, if I ever overcome my shame.  [Editor’s note: he overcame that shame.]

There are two things about the book that we deliberately chose not to faithfully recreate.  The first is the font face.  My best guess is that the book was typeset using something from the Century family, possibly Century Schoolbook (the New version of which was a particular favorite of mine in college).  The very-widely-installed Cambria seems fairly similar, at least to my admittedly untrained eye, and furthermore was designed specifically for screen media, so I went with body text styling no more complicated than this:

body {
	font: 1em/1.35 Cambria, Times, serif;
	hyphens: auto;
}

I suppose I could have tracked down a free version of Century and used it as a custom font, but I couldn’t justify the performance cost in both download and rendering speed to myself and any future readers.  And the result really did seem close enough to the original to accept.

The second thing we didn’t recreate is the printed-page layout, which is two-column.  That sort of layout can work very well on the book page; it almost always stinks on a Web page.  Thus, the content of the book is rendered online in a single column.  The exceptions are the chapter-ending Bibliography sections and the book’s Index, both of which contain content compact and granular enough that we could get away with the original layout.

There’s a lot more I could say about how this style or that pattern came about, and maybe someday I will, but for now let me leave you with this: all these decisions are subject to change, and open to input.  If you come up with a superior markup scheme for any of the bits of the book, we’re happy to look at pull requests or issues, and to act on them.  It is, as we say in our preface to the online edition, a living project.

We also hope that, by laying bare the grim reality of these horrific weapons, we can contribute in some small way to making them a dead and buried technology.


No, Apple Did Not Crowdfund :focus-visible in Safari

Published 2 years, 9 months past

It’s not every week the release notes for a preview build of a web browser ignite Yet Another Twitter Teacup Storm (YATTS™), but that’s what happened when Safari Technology Preview 138 dropped late last week. At least, it’s what happened in the Twitter Teacups I tend to sip.

Just in case you missed it, here’s the summary:

  1. The WebKit team released Safari Technology Preview 138, and the release notes for same.
  2. The “CSS” section of the release notes started with a line saying:
    Enabled :focus-visible pseudo-class by default (r286783, r286776, r286775)
  3. A few people, including Jen Simmons, gave credit to Igalia for implementing :focus-visible by means of a crowdfunding project (more on that in a moment).
  4. KABOOM

I suppose I could be a bit more explicit in step 4, but I don’t really want to get into speculating on apparent motives and assumptions by others, because that’s not the point of this post. The point of this post is to clear up what seems to be a very common misunderstanding.

What I kept seeing people saying was something to the effect of, “Why the hell did Apple have to crowdfund this feature?” And that’s wrong in two ways:

  1. Apple doesn’t have to crowdfund anything, up to and including colonization of the Moon. (They might have to ask for a few bucks to do Venus or Mars.)
  2. Apple didn’t crowdfund :focus-visible.

This isn’t me splitting hairs, either. Nobody at Apple asked the crowd to fund anything. Nobody at Apple asked Igalia to crowdfund anything. They didn’t even ask Igalia to implement :focus-visible, and then Igalia decided to crowdfund the work. In fact, all of those assumptions get things almost exactly backwards — which is understandable! It’s what we expect from our experience of how the web has developed since at least the late 1990s. But here, something new happened.

So, let me summarize what happened using yet another ordered list:

  1. Igalia noticed they’d done a fair bit of work adding features to all the browser engines (e.g., CSS Grid), with each project supported by a single paying client, and thought, “Wait a minute, the web is a commons. Why are features being driven one client at a time?”
  2. Of its own volition, Igalia decided to experiment with the idea of letting the web community (the “crowd”) vote for implementation of a missing browser feature with their wallets (the “funding”). They called this ongoing experiment Open Prioritization, and launched it in 2019.
  3. There were six possible projects, chosen by Igalia through their own set of criteria, for the community to vote on by pledging monetary support:
    • CSS lab() colors in Firefox
    • :focus-visible in WebKit/Safari
    • HTML inert in WebKit/Safari
    • Selector list arguments for :not() in Chrome
    • CSS Containment support in WebKit/Safari
    • CSS d (SVG path) support in Firefox
  4. The winner was implementing :focus-visible in WebKit/Safari, and by “winner”, I mean that project got the most monetary commitment from the members of the community.
  5. Igalia matched the community contributions dollar for dollar, and moved forward with the work.
  6. The work was done, and submitted to the WebKit code base. (Along the way, inconsistencies and other problems were discovered, addressed, and fixes contributed to engines other than WebKit.)
  7. The WebKit team accepted Igalia’s contributions, and are now shipping them in a preview build of Safari for developers to test out.

In other words: the community (more precisely, a portion of it) voted on which feature was most needed, Igalia implemented it, and Apple accepted it. Apple’s role in this process came at the end, not the beginning.

And no, this is not the usual thing! It’s not supposed to be. Igalia is deeply committed to not just advancing the web, but to an unprecedented extent democratizing that advancement. It isn’t anything like a pure democratic effort, at least not yet, but these are early days and the initiative is structured to meet the current constraints of the environment (read: living under capitalism means coders gotta get paid).

But why is Igalia doing this? Time for another list! Just to switch things up, this one will be unordered:

  • Because the community should have more of a say in what gets prioritized in browsers. The community can be large collections of individuals, or it could be small collections of small companies, or a mix.
  • Because in every browser team, there’s always a priority list, and sometimes good features get pushed down that list for various reasons. It could be lack of expertise. It could be lack of time. It could be lack of interest. It could be interference by higher-ups. It doesn’t matter.
  • Because browser teams — not any one team, but the unfortunately small number of browser teams — are a bottleneck. No matter how much money the companies who employ those teams throw at them, they will always be a bottleneck, because resources are finite.

And this brings us to why I think “Wait, shouldn’t the $browser_name team have already done $feature_name by now? Why did an outside party have to do it?” is a little short-sighted. There will always be a $feature_name that the $browser_name team hasn’t done yet, for any value of $browser_name you care to posit. Today it could be WebKit; tomorrow, Chromium. In ten years, maybe there will be teams at Amazon and Huawei, making browser engines that compete for user share. Maybe not. Doesn’t actually matter, because however many or few engines there are, no matter what their priorities are, this problem will persist.

This is also why I’m not getting into Apple’s funding levels and priorities for WebKit and the web. Yes, there is much Apple-the-company can be criticized about, and personally, I am one of the biggest fans browser-engine diversity ever had, but that is a different conversation. Even if you could somehow wave a magic wand and open all platforms everywhere to engine diversity, and simultaneously cause a thousand browsers to bloom, we would still have the same basic problem. Open Prioritization would still need to exist.

For another piece of evidence on that point, look at the second Open Prioritization project: MathML-Core, whose goal is to bring full cross-browser support for the MathML Core specification to browsers, starting with Chrome (which needs the most work in this area) and then moving on to other engines (which need less work, but still need work). Doing this will not only improve support for web-wide math markup and its visual rendering, but will also improve the accessibility of math content on the web by making math a first-class content type in browsers. And you can even now contribute to this effort with a pledge of your own!

“But wait, why didn’t $browser_name already finish implementing MathML Core?” It doesn’t matter. Whether or not $browser_name (whichever one that is) should have done this by now, they haven’t. Maybe they would have done it eventually, but again, that doesn’t matter. We can make it happen now.

That’s what happened with :focus-visible in WebKit, which helped improve other engines; it’s what will happen with MathML Core in various browsers; and it could very well be what happens with other features in the future. Igalia would love nothing more than to see more and more projects launch, even if they don’t get hired to do the work for a single one of them. This isn’t us spackling over the cracks of browser teams’ neglect. This is us trying to chart an entirely new way to advance browser engines.

I go deeper into all of the above, as well as how Open Prioritization is designed to be an open forum and not some private reserve of Igalia’s, in a 17-minute talk delivered at W3C TPAC in fall 2021, available and captioned on Igalia’s YouTube channel. This post sort of summarizes it, but there are more examples and details in the talk, so if you’re interested, please do check that out.

Just in case your eyes sort of glazed and you skipped to the end to see if there was a TL;DR, here it is:

The addition of :focus-visible to WebKit was lead by the community, done by Igalia, and contributed to WebKit without any involvement from Apple except in the sense of their reviewing patches and accepting the contributions. Many of us are mad at Apple for a lot of good reasons, but please don’t let the process of venting that anger tar the goals and achievements of Open Prioritization. The future browser-feature priority you save may be your own.


Better Image Optimization by Restricting the Color Index

Published 4 years, 7 months past

Let’s talk about image optimization.  There are a few images used in meyerweb’s new design, and while I wanted them to be pleasing to the eye, I also wanted them to be lightweight.  My rough goal was to not have the design elements (images plus CSS) be more than half the total page weight for a typical blog post, not counting any post-specific images like photos or diagrams.  Thus, if a typical blog post’s page weight was 500KB, I didn’t want the images and CSS to add up to more than 250KB or so.

Spoiler: I achieved my goal, but at the same time fell short.  What I had overlooked was custom fonts, which I’ll get to in a later post.

I found out that how you optimize images matters a whole lot.  Let’s consider one example: the spiral-like image (which, yes, is a quiet callback to past work) at the center of the previous-next links at the bottom of blog posts and archive pages.  After I extracted a full-resolution copy of that particular sketch from pages 13-14 of Hamonshū, Vol. 1 and did a little cleanup with filters and so on, it became a 1.4MB Acorn file.

The full-size image in Acorn.

(Side note: Acorn’s “Transparentomatic” filter was an enormous time-saver on this project — it made dropping out the page texture a breeze, and easily adjustable, without forcing me to create and retouch mask layers and whatnot.  Thanks, Flying Meat!)

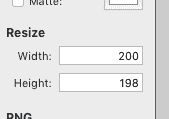
With the image ready to be tested in-browser, I would use Acorn’s Web Export dialog to save it as a PNG.  The nice thing about this dialog is its built-in Resize feature, which let me keep the Acorn file at its native size (almost a thousand pixels on each side) and export it to the size I wanted — in this case, 200 pixels across.  I did this sort of thing a lot, because I tested a variety of images for every design element.

Once I settled on the image I wanted, I’d drop it on ImageOptim to optimize it.  This usually slammed all eight cores in my aged laptop’s CPU for a good few seconds, and resulted in up to 5% size savings.

That last paragraph probably looks like an indictment of ImageOptim, but wait!  It’s fully redeemed by the end of the post, by which time I will have indicted myself instead.

At this point, my spiral image had gone from a 1.4MB Acorn file to a 30KB PNG.  That’s pretty good, even if 30KB feels a tad bulky for a 200×200 image.  I just assumed, what with all the transparency and shades of color and all that, it wasn’t too far out of line.  But as the whole design started to come together, I discovered that when you added up all the illustration images on, say, the home page, I’d let image bloat sneak up on me in the worst way.  They were totalling close to a megabyte, and they’d all been through ImageOptim already.

I went back to Acorn to see if I could squeeze any more out of the file size, maybe convert some of the images to JPGs if they didn’t need the transparency.  As I flipped between file formats in the Web Export dialog, I noticed something I’d previously overlooked in the PNG export options: a bit depth slider.  I’d been saving the PNGs with no bit depth restrictions, meaning the color table was holding space for 224 colors.  That’s… a lot of colors, roughly 224 of which I wasn’t actually using.

When I clicked the “Index PNG Colors” checkbox and changed the slider until I started getting dithers or obvious color loss, then brought it up a notch or two, the difference was astounding.  Instead of a 30KB file, I got a 4.4 KB file.  Instead of saving at 75% the original size, it was now 11%.

Wait a second… how long has THAT been there?

So I went back through the directory with all my design elements and repeated the process.  I do have batch image processing software installed, but I elected to do this manually so I could pick the best color depth for each file by eye.  It could be that some would be okay at 4 colors instead of 8; others might need 16 or 32 to retain visual fidelity.  Fortunately for me, I only had a couple dozen images to go through, but it would have been worth it even at 10 times that many.

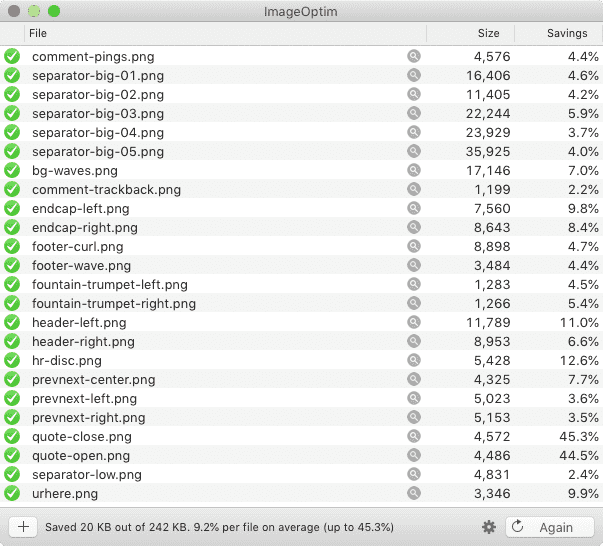
Once I’d gone through all the images and saved them with restricted color depth, my theme’s image directory was down to 242KB total.  The biggest of them, the separator wave illustrations, had gone from being ~150KB each to ~25KB each — all five of them together now totalled less than just one of them had before I did the color indexing.

The directory, well and fully smooshed.

At this point, I thought, “All right, let’s see what ImageOptim does with these.”  It squeezed them down even further, taking my total from 242KB to 222KB, a nine percent reduction.  Which is to say, the percentage savings I got on these already-small files was larger than I’d been getting on the much bigger files — plus, ImageOptim processed them quickly and with a minimum of CPU slamming.  Which is honestly pretty great, given the age of my laptop (about seven years).

So: did I meet my performance goal?  As I said at the outset, yes, but also no.  For a single blog post with around 10KB of text content and no embedded media, the page weight is around 460KB, with the size varying a bit depending on how much markup is needed for the 10KB of text.  (Here’s one recent example with some content variety.)  Of that, the CSS, split across two files, totals 35.2KB.  The images add up to 102.9KB.  Add them together, and you get just a hair over 138KB, or right around 30%.  Huge success!

Except I hadn’t factored in custom fonts, which all by themselves currently total 203.6KB (44% total page weight), mostly due to the three faces of IM Fell I’m using.  That’s right: The fonts weigh more than the CSS and images put together.  Once they’re added in with the CSS and images, the design elements end up being almost 75% the total page weight — about 341.6KB of the 460KB total.  Most of the rest is the 104.4KB chewed up by showdown.js, the enhancement script I’m using to allow the use of Markdown in post comments.

Thus, next up on my performance quest is looking into subsetting the fonts I’m using in order to get their weight down, and finding out if there’s anything I can do to subset Showdown as well.

But as of now, I’m well pleased with where I ended up on image optimization.  I just need to go back and do the same for post-specific images I’d left at unrestricted color depths, where I anticipate a similar 90% savings in file sizes.  If you’ve got a lot of images, particularly PNGs, try running them through a process that lets you restrict the color depth, and see how much it saves.  The results might surprise you!


Get Static

Published 4 years, 8 months past

If you are in charge of a web site that provides even slightly important information, or important services, it’s time to get static.  I’m thinking here of sites for places like health departments (and pretty much all government services), hospitals and clinics, utility services, food delivery and ordering, and I’m sure there are more that haven’t occurred to me.  As much as you possibly can, get it down to static HTML and CSS and maybe a tiny bit of enhancing JS, and pare away every byte you can.

Because too many sites are already crashing because their CMSes can’t keep up with the traffic surges.  And too many sites are using dynamic frameworks that drain mobile batteries and shut out people with older browsers.  That’s annoying and counter-productive in the best of times, but right now, it’s unacceptable.  This is not the time for “well, this is as performant as our stack gets, so I guess users will have to live with it”.  Performance isn’t just something to aspire to any more.  Right now, in some situations, performance could literally be life-saving to a user, or their family.

We’re in this to serve our users.  The best service you can render at this moment is to make sure they can use your site or service, not get 502/Bad Gateway or a two-minute 20%-battery-drain page render.  Everything should take several back seats to this effort.

I can’t tell you how best to get static — only you can figure that out.  Maybe for you, getting static means using very aggressive server caching and a cache-buster approach to updating info.  Maybe it means using some kind of static-render plugin for your CMS.  Maybe is means accelerating a planned migration to a static-site CMS like Jekyll or Eleventy or Grav.  Maybe it means saving pages as HTML from your browser and hand-assembling a static copy of your site for now.  There are a lot of ways to do this, but whatever way you choose, do it now.


Addendum: following are a few resources that can help. Please suggest more in the comments!


CWRU2K

Published 4 years, 10 months past

Before I tell you this story of January 1st, 2000, I need to back things up a few months into mid-1999.  I was working at Case Western Reserve University as a Hypermedia Systems Specialist, which was the closest the university’s job title patterns could get to my actual job which was, no irony or shade, campus Webmaster.  I was in charge of www.cwru.edu and providing support to departments who wanted a Web presence on our server, among many other things.  My fellow Digital Media Services employees provided similar support for other library and university systems.

So in mid-1999, we were deep in the throes of Y2K certification.  The young’uns in the audience won’t remember this, but to avoid loss of data and services when the year rolled from 1999 to 2000, pretty much the entire computer industry was engaged in a deep audit of every computer and program under our care.  There’s really been nothing quite like it, before or since, but the job got done.  In fact, it got done so well, barely anything adverse happened and some misguided people now think it was all a hoax designed to extract hefty consulting fees, instead of the successful global preventative effort it actually was.

As for us, pretty much everything on the Web side was fine.  And then, in the middle of one of our staff meetings about Y2K certification, John Sully said something to the effect of, “Wouldn’t it be funny if the Web server suddenly thought it was 1900 and you had to use a telegraph to connect to it?”

We all laughed and riffed on the concept for a bit and then went back to Serious Work Topics, but the idea stuck in my head.  What would a 1900-era Web site look like?  Technology issues aside, it wasn’t a complete paradox: the ancestor parts of CWRU, the Case Institute of Technology and the Western Reserve University, had long existed by 1900 (founded 1880 and 1826, respectively).  The campus photos would be black and white rather than color, but there would still be photos.  The visual aesthetic might be different, but…

I decided so make it a reality, and CWRU2K was born.  With the help of the staff at University Archives and a flatbed scanner I hauled across campus on a loading dolly, I scanned a couple dozen photos from the period 1897-1900 — basically, all those that were known to be in the public domain, and which depicted the kinds of scenes you might put on a Web site’s home page.

Then I reskinned the home page to look more “old-timey” without completely altering the layout or look.  Instead of university-logo blues and gold, I recolored everything to be wood-grain.  Helvetica was replaced with an “Old West” font in the images, of which there were several, mostly in the form of MM_swapimage-style rollover buttons.  In the process, I actually had to introduce two Y2K bugs to the code we used to generate dates on the page, so that instead of saying 2000 they’d actually say 1899 or 1900.  I altered other things to match the time, like altering the phone number to use two-letters-then-numbers format while still retaining full international dialing information and adding little curlicues to things.  Well before the holidays, everything was ready.

The files were staged, a cron job was set up, and at midnight on January 1st, 2000, the home page seamlessly switched over to its 1900 incarnation.  That’s a static snapshot of the page, so the picture will never change, but I have a gallery of all the pictures that could appear, along with their captions, which I strove to write in that deadpan stating-the-obvious tone the late 19th Century always brings to my mind.  (And take a close look at the team photo of The Rough Riders!)

In hindsight, our mistake was most likely in adding a similarly deadpan note to the home page that read:

Year 2000 Issues

Despite our best efforts at averting Y2K problems, it seems that our Web server now believes that it is January of 1900. Please be advised that we are working diligently on the problem and hope to have it fixed soon.

I say that was a mistake because it was quoted verbatim in stories at Wired and The Washington Post about Y2K glitches.  Where they said we’d actually suffered a real, unintentional Y2K bug, with Wired giving us points for having “guts” in publicly calling “a glitch a glitch”.  After I emailed both reporters to explain the situation and point them to our press release about it, The Washington Post did publish a correction a few days later, buried in a bottom corner of page A16 or something like that.  So far as I know, Wired never acknowledged the error.

CWRU2K lasted a little more than a day.  Although we’d planned to leave it up until the end of January, we were ordered to take it down on January 2nd.  My boss, Ron Ryan, was directed to put a note in my Permanent Record.  The general attitude Ron conveyed to me was along the lines of, “The administration says it’s clever and all, but it’s time to go back to the regular home page.  Next time, we need to ask permission rather than forgiveness.”

What we didn’t know at the time was how close he’d come to being fired.  At Ron’s retirement party last year, the guy who was his boss on January 2nd, 2000, Jim Barker, told Ron that Jim had been summoned that day to a Vice President’s office, read the riot act, and was sent away with instructions to “fire Ron’s ass”.  Fortunately, Jim… didn’t.  And then kept it to himself for almost 20 years.

There were a number of other consequences.  We got a quite a bit of email about it, some in on the joke, others taking it as seriously as Wired.  There’s a particularly lovely note partway down that page from the widow of a Professor Emeritus, and have to admit that I still smile over the props we got from folks on the NANOG mailing list.  I took an offer to join a startup a couple of months later, and while I was probably ready to move on in any case, the CWRU2K episode — or rather, the administration’s reaction to it — helped push me to make the jump.  I was probably being a little juvenile and over-reacting, but I guess you do that when you’re younger.  (And I probably would have left the next year regardless, when I got the offer to join Netscape as a Standards Evangelist.  Actual job title!)

So, that’s the story of how Y2K affected me.  There are some things I probably would have done differently if I had it to do over, but I’m 100% glad we did it.

  • CWRU2K was published on .
  • It was assigned to the History and Web categories.
  • There has been one reply.

Browse the Archive

Earlier Entries

Later Entries