Grid-Powered Drop Quotes
Published 9 years, 3 months pastI’ve been experimenting with CSS Grid for various layout treatments — not high-level, whole-page layouts, but focused bits of design. I’d like to share one of them for a few reasons. Partly it’s because I like what I came up with. More importantly, though, I think it illustrates a few principles and uses of CSS Grid that might not be immediately intuitively obvious.
First, here’s an interactive demo of the thing I’m going to be talking about. You can use the checkboxes to alter aspects of the example, whether singly or in combination. Feel free to fiddle with them before reading the rest of the article, or but you’ll probably want to come back to the demonstration as you read. There’s also an external version of the demo as a standalone file, if you prefer opening it in a new tab and flipping back and forth.
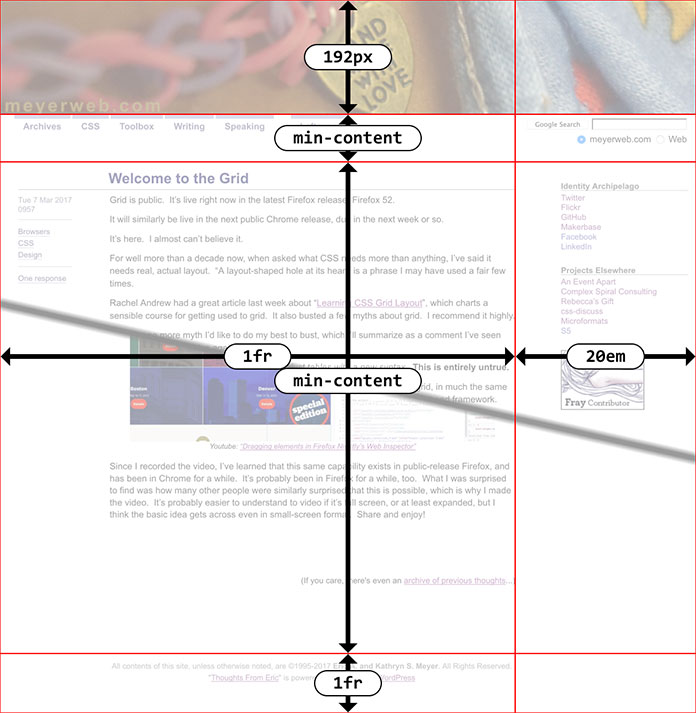
Let’s dig in! The core concept here is a Grid-powered version of the big drop-quote on the left side, there, which is a relatively common treatment for blockquotes. To make this happen, I’ve applied display: grid to the blockquote element itself, and added the opening quote using generated content, like so:
blockquote {
   display: grid;
   grid-template-columns: -webkit-min-content 1fr;
   grid-template-columns: min-content 1fr;
}
blockquote::before {
   grid-column: 1;
   content: "“";
   font-size: 5em;
   font-weight: bold;
}
There’s more to the actual styles of both rules, but that’s the central thesis: set up a two-column grid, and generate a great big opening quote.
The first thing to note here is that generated content also generates a pseudo-element that can be styled. You may already realize this, since it’s known we can style generated content separately from the main content of the element. But given that, if a grid is applied to the element, then any generated content’s pseudo-element, whether ::before or ::after, will become a grid item. You can then place it in the grid.
I first came across this concept in the comments on my ALA article “Practical CSS Grid”, where Šime proposed using generated elements as a hack to get around the inability to directly style grid cells. Here, I’m just using one to push a quote over to the side.
Why do this, when we can already use floats or relative/absolute positioning approaches to do the same? Because it’s not quite the same: with Grid, the column containing the drop-quote responds to any changes to the quotation symbol. Change the font, change its size, have the preferred font fail and fall back to an unexpected face, or replace the character with an SVG image, and the first column will resize thanks to the min-content track sizing, and the actual main content of the blockquote will adjust its placement to accommodate. That didn’t happen with earlier techniques.
And yes, there is a vendor prefix in there. Safari’s 10.1 Grid support came with -webkit- prefixed versions of min-content, max-content, and fit-content. So I did the old pattern of prefixed first, unprefixed second. This should be necessary only until the next release; Safari has already dropped the prefixes in its latest Technology Preview builds. The change apparently just didn’t quite make the cut for 10.1. It’s sad, but it’s also temporary.
In the meantime, this does mean that if you want to restrict your Grid styles only to implementations that don’t require prefixes, use that in your feature queries:
@supports (grid-template-columns: min-content) {…}
That, as well as a number of close variants like using grid-template-rows or max-content, will keep your Grid styles away from Safari until they update their Grid support in the public release channel.
That’s all nice, but there’s a great deal more to learn! If you use the “Border” checkbox in the demo, you’ll see a dotted red border around the drop quote’s pseudo-element. Notice that it matches the height of the opening paragraph, not the entire height of the blockquote. That’s because the pseudo-element and the first paragraph share a row track. The following paragraphs are in their own row tracks.
This brings up two things to consider. First, all the child elements of the blockquote are now grid items. That means the drop quote’s pseudo-element, but also all the paragraphs contained by the blockquote. The same would happen to any child elements. We could get around that by wrapping all the contents of the blockquote in a div or something like that, but I’d rather not. So, this grid has four grid items: the pseudo-element, and three paragraphs.
This leads us to the second consideration: without placing the paragraphs into the same column, they’ll auto-flow into whatever grid cells are available. You can see this by selecting the “Auto placement” option. The first column will contain the quote and the second paragraph, as narrow as they both can be due to min-content. The second column will contain the first and third paragraphs.
How I get around this in the working version is to explicitly put all the paragraphs — really, all child elements of the blockquote, which just happen in the case to be paragraphs — into the second column, like this:
blockquote > * {grid-column: 2;}
Okay, but how do they end up stacked vertically? After all, I didn’t assign each of those child elements to a row, did I?
Wait a minute. What rows?
If you go back and look at the CSS I showed, there is nothing about rows. The property grid-template-rows exists, but I didn’t use it. All I did was define columns.
Each child element goes into a row of its own anyway, because Grid has the ability to automatically create columns or rows when needed. Suppose you define a three-by-three grid, and then assign a grid item to the fifth column of the fourth row. What should happen? The browser should auto-create as many columns and rows as needed. Any auto-created tracks will have zero width or height if they don’t contain any grid items, unless you size them using grid-auto-columns or grid-auto-rows, but we’re not going there today. The point is, here I’ve said all of the blockquote’s child elements should go into column 2. Given that, they’ll auto-fill rows as available and auto-create rows as needed, filling them in once they’re created.
So the blockquote in the demo above has two columns because I explicitly defined them, and three rows because that’s what it needed to create to handle the three child elements. If I’d added two more paragraphs and an unordered list, the grid would have had two columns and six rows (because six chid elements).
There are a lot of possible extensions to this technique. A close quote could be created using ::after and placed in the last row of the grid, thanks to the ability to use negative track values to count back from the end of the grid. Thus:
blockquote::after {
   grid-column: 3;
   grid-row: -1;
   content: "”";
   font-size: 5em;
   font-weight: bold;
}
That places the close-quote in the third column, so to the right of the quoted text, and in the last row, regardless of how many rows were auto-created. Of course, there is no third column…or there wasn’t, until assigning something to the third column. At the point, the browser created it.
The danger there is that the auto-generated column is essentially tacked on to the trailing edge of the grid, without real consideration for what might be in the way — up to and including the edge of the viewport. Rather than auto-generate the column, we could define a third column like so:
grid-template-columns: min-content 1fr min-content;
This sets up a column on each side of the grid, one for each of the big quotes. The second column, the one that gets all the actual child elements of the blockquote, receives all the space left over after those outer columns are sized, thanks to its 1fr value.
There’s one more drawback here, albeit one that’s easily overcome. Grid items’ margins do not collapse. You can see this effect by checking the “Default margins” option in the demo. That shows what happens if default paragraph margins are allowed to remain. We end up with two ems of space between the paragraphs, because each has top and bottom margins of 1em.
In the normal flow, margins collapse to the largest of the adjacent margins, which is why we’re used to 1em of space between adjacent paragraphs. With grid items, what we see instead is the full element box, margins and all, placed inside the grid cell(s) they occupy. That means any margin will create space between the edge of the grid cell and the border-edge of the element. The fix here is straightforward: add a style to reduce margins between elements. For example, something like:
blockquote > * {
   grid-column: 2;
   margin: 0.5em 0;
}
With a half-em margin above and below each element, any two adjacent elements will have the common 1em separation. The demo actually has less than that because I wanted to use the print convention of paragraphs with the first lines indented, and a minor separation between paragraphs. So the actual demo styles are more like this:
blockquote > * {
   grid-column: 2;
   margin: 0.125em 0;
   text-indent: 2.5em;
}
blockquote > *:first-child {
   text-indent: 0;
}
So there you have it: a Grid-powered drop quote. I should note that all this by itself isn’t quite sufficient: if Grid isn’t supported, it will degrade poorly, as you can verify with the “Disable grid” option.
This is where using @supports() to encapsulate the Grid styling comes in handy. You can put all of the quote-generation styles into the @supports() block, so that downlevel browsers just don’t get the drop quotes; or, you can set up the drop quotes with floats or positioning and then override those with @supports()-protected Grid styles. Either one works.
Fortunately, we do have that capability, so it’s fairly easy to progressively enhance your designs with little touches like this one, even if you’re not ready for a full-on Grid plunge. I’m looking forward to deploying this pattern here on meyerweb, as part of a site design overhaul I’ve been working on for the past couple of weeks. That’s right: I’m working on my first redesign in a dozen years. If that doesn’t give you some sense of the power of Grid, well, I just don’t know what will.
There is a followup to this article that explains and corrects an oversight in this article.