A sizeable chunk of my work at Igalia so far involves editing and updating the Mozilla Developer Network (MDN), and a smaller chunk has me working on the Web Platform Tests (WPT). In both cases, the content is stored in large public repositories (MDN, WPT) and contributors are encouraged to fork the repositories, clone them locally, and push updates via the fork as PRs (Pull Requests). And while both repositories roll in localhost web server setups so you can preview your edits locally, each has its own.
As useful as these are, if you ignore the whole “auto-force a browser page reload every time the file is modified in any way whatsoever” thing that I’ve been trying very hard to keep from discouraging me from saving often, each has to be started in its own way, from within their respective repository directories, and it’s generally a lot more convenient to do so in a separate Terminal window.
I was getting tired of constantly opening a new Terminal window, cding into the correct place, remembering the exact invocation needed to launch the local server, and on and on, so I decided to make my life slightly easier with a few short scripts and aliases. Maybe this will be useful to you as well.
First, I decided to keep things relatively simple. Instead of writing a small program that would handle all server startups by parsing shell arguments and what have you, I wrote a couple of very similar shell scripts. Here’s the script for launching MDN’s localhost:
alias mdn-server="open -a Terminal.app ~/bin/mdn-start.bsh"
Translated into English, that means “open the file ~/bin/mdn-start.bsh using the -application Terminal.app”.
Thus, when I type mdn-server in any command prompt, a new Terminal window will open and the shell script mdn-start.bsh will be run; the script switches into the needed directory and launches the localhost server using yarn, as per the MDN instructions. What’s more, when I’m done working on MDN, I can switch to the window running the server, stop the server with ⌃C (control-C), and the Terminal window closes automatically.
I did something very similar for WPT, except in this case the alias reads:
alias wpt-server="open -a Terminal.app ~/bin/wpt-serve.bsh"
And the script to which it points reads:
#!/bin/bash
cd ~/repos/wpt/
./wpt serve
As I mentioned before, I chose to do it this way rather than writing a single alias (say, local-server) that would accept arguments (mdn, wpt, etc.) and fire off scripts accordingly, but that’s also an option and a viable one at that.
So that’s my little QoL (Quality of Life) upgrade to make working on MDN and WPT a little easier. I hope it helps you in some way!
For years, I’ve had a bash alias that re-runs the previous command via sudo. This is useful in situations where I try to do a thing that requires root access, and I’m not root (because I am never root). Rather than have to retype the whole thing with a sudo on the front, I just type please and it does that for me. It looked like this in my .bashrc file:
alias please='sudo "$BASH" -c "$(history -p !!)"'
But then, the other day, I saw Kat Maddox’s tweet about how she aliases please straight to sudo, so to do things as root, she types please apt update, which is equivalent to sudo apt update. Which is pretty great, and I want to do that! Only, I already have that word aliased.
What to do? A bash function! After commenting out my old alias, here’s what I added to .bash_profile:
please() {
	if [ "$1" ]; then
		sudo $@
	else
		sudo "$BASH" -c "$(history -p !!)"
	fi
}
That way, if I remember to type please apachectl restart, as in Kat’s setup, it will ask for the root password and then execute the command as root; if I forget my manners and simply type apachectl restart, then when I’m told I don’t have privileges to do that, I just type please and the old behavior happens. Best of both worlds!
What happened was, I was preparing to roll out new designs for the News section and eventpages of An Event Apart, and I had each rollout in its own branch. Somewhere in the process of bringing both into the master branch, I managed to create a merge conflict that rapidly led to more and more conflicts. I very nearly had to take off and nuke the entire site from orbit, just to start over. (A couple of branches, including dev, did have to get erased and re-pulled.)
Part of what made it worse was that at one point, I accidentally committed a quick edit to master, because I’d forgotten to check out the branch I was trying to edit, and my attempts to undo that mistake just compounded whatever other mistakes already existed. Once all the dust settled and things were back into good shape, I said to myself, “Self, I bet there’s a way to prevent commits to the master branch, because git is second only to emacs in the number of things you can do to/with it.” So I went looking, and yes, there is a way: add the following to your .git/hooks/pre-commit file.
#!/bin/sh

branch="$(git rev-parse --abbrev-ref HEAD)"

if [ "$branch" = "master" ]; then
  echo "You can't commit directly to master branch"
  exit 1
fi
I got that from this StackOverflow answer, and it was perfect for me, since I use the bash shell. So I created the pre-commit file, made a trivial README.md edit, and tried to commit to master. That’s when OS X Mojave’s Terminal spit back:
fatal: cannot exec '.git/hooks/pre-commit': Operation not permitted
Huh. I mean, it prevented me from committing to master, but not in a useful way. Once I verified that it happened in all branches, not just master, I knew there was trouble.
I checked permissions and all the rest, but I was still getting the error. If I went into .git/hooks and ran the script from the command line by ./pre-commit, I got a slightly different error:
-bash: ./pre-commit: /bin/bash: bad interpreter: Operation not permitted
So I submitted my own StackOverflow question, detailing what I’d done and the file and directory permissions and all the rest. I was stunned to find out the answer was that Mojave itself was blocking things, through its System Integrity Protection feature. Why did this simple file trigger SIP? I don’t know.
The fix, shared by both Jeff and Rich, was to go into .git/hooks and then type the following to check for SIP status:
xattr -l pre-commit
It showed a com.apple.quarantine value, so I then typed:
xattr -d com.apple.quarantine pre-commit
And that was it! Now if I try to commit a change to the master branch, the commit is rejected and I get a warning message. At that point, I can git stash the changes, check out the proper branch (or a new one), and then git stash pop to bring the changes into that branch, where I can commit them and then merge the changes in properly.
I may modify the script to reject commits to the dev branch as well, but I’m holding off on that for now, since the dev branch is often where merge conflicts are worked out before going to master. Either way, at least I’ll be less likely to accidentally foul up master when I’m hip-deep in other problems.
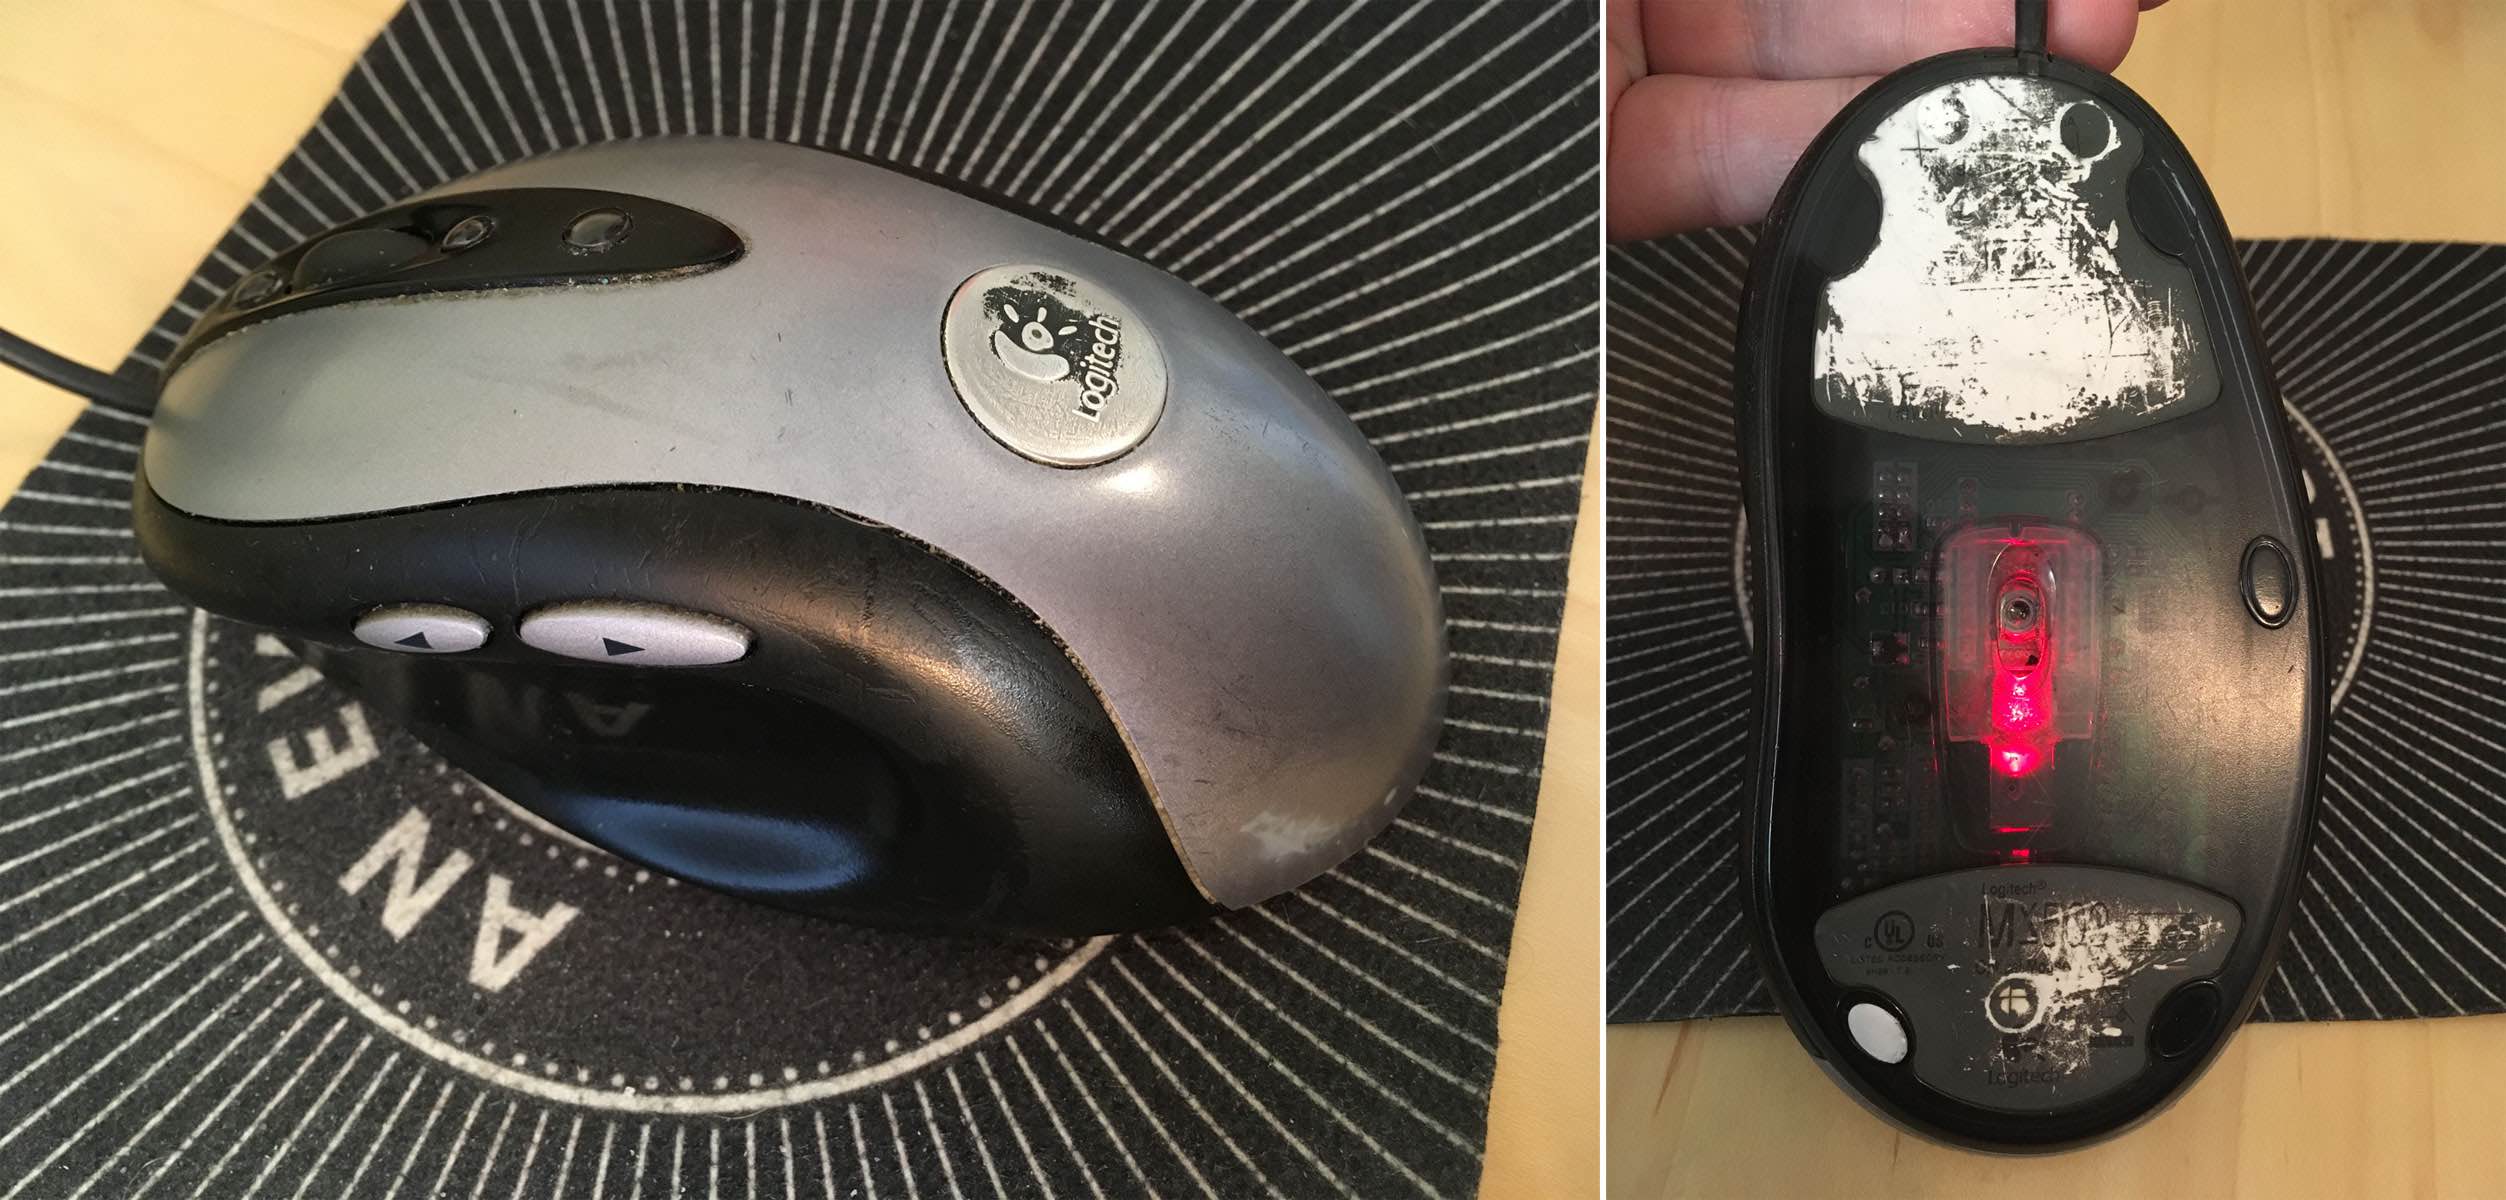
I’ve relied on a mouse for about a decade and a half. I don’t mean “relied on a mouse” in the generic sense, but rather in the sense that I’ve relied on one very specific and venerable mouse: a Logitech MX500.
I’ve had it for so long, I’d forgotten how long I’ve had it. I searched for information about its production dates and wouldn’t you know it, Wikipedia has an article devoted solely to Logitech products throughout history, because of course it does, and it lists (among other things) their dates of release. The MX500 was released in 2002, and superseded by the MX510 in 2004. I then remembered a photo I took of my eldest child when she was an infant, trying to chew on a computer mouse. I dug it out of my iPhoto library and yep, it’s my MX500. The picture is dated June 2004.
So I have photographic evidence that I’ve used this specific mouse for 15 years or more. The logo plate on top of the mouse has been worn half-smooth and half-paintless by the palm of my hand, much like the shiny-smooth areas worn into the subtle matte surface texture where the thumb and pinky finger grip the sides. The model and technical information printed on the underside has similarly worn away. It started out with four little oval glide nubs on the underside that held the bottom away from the desk surface; only one remains. Even though, as an optical mouse, it can be used on any surface, I eventually went back to soft mousepads, so as to limit further undercarriage damage.
The old gray mare — er, mouse — proving that it’s not the years, it’s the mileage
Why have I been so devoted to this mouse? Well, it’s incredibly well engineered, for one — it’s put up with 15 years of daily use. It’s exactly the right shape for my hand, and it has multiple configurable inputs right where I expect them. There are arrow buttons just above my thumb which I use as forward/backward in browsers, buttons above and below the scroll wheel that I map to Page Up/Page Down, an extra button at almost the apex of the mouse’s back mapped to ⌥⇥ (Option-Tab), and the usual right/left mouse click buttons. Plus the scroll wheel is itself a push-down-to-click button.
Most of these features can be found on one mouse or another, but it’s rare to find them all in one mouse — and next to impossible to find them in a shape and size that feels comfortable to me. I’d occasionally looked at the secondary market, but even used, the MX500 can command three figures. I checked Amazon as I wrote this, and an unused MX500 was listing for two hundred fifty dollars. Unused copies of its successor, the MX510, were selling for even more.
Now, if you were into gaming in the first decade of the 2000s, you may have heard of or used the MX510’s successor, the MX518. Released in 2005, it was basically an MX500/MX510, but branded for gaming, with some optical-sensor upgrades for more tracking precision. The MX518 lasted until 2011, when it was superseded by a different model, which itself was superseded, which et cetera, et cereta, et cetera.
Which brings me to the point of all this. A few weeks ago, after several weeks of sporadic glitches, the scroll wheel on my MX500 almost completely stopped responding to being scrolled. Which maybe doesn’t sound like a big deal, but try going without your scroll wheel for a while. I was surprised to discover how much I relied on it. So, glumly, knowing the model was long out of production and incredibly expensive to buy, I went searching for equivalents.
And that’s when I discovered that Logitech had literally announced less than a week earlier that they were releasing an updated MX518, available for pre-order.
Friends, I have never pre-ordered anything so fast.
This past Thursday afternoon, it arrived. I got it set up and have been working with it since. And I have some impressions.
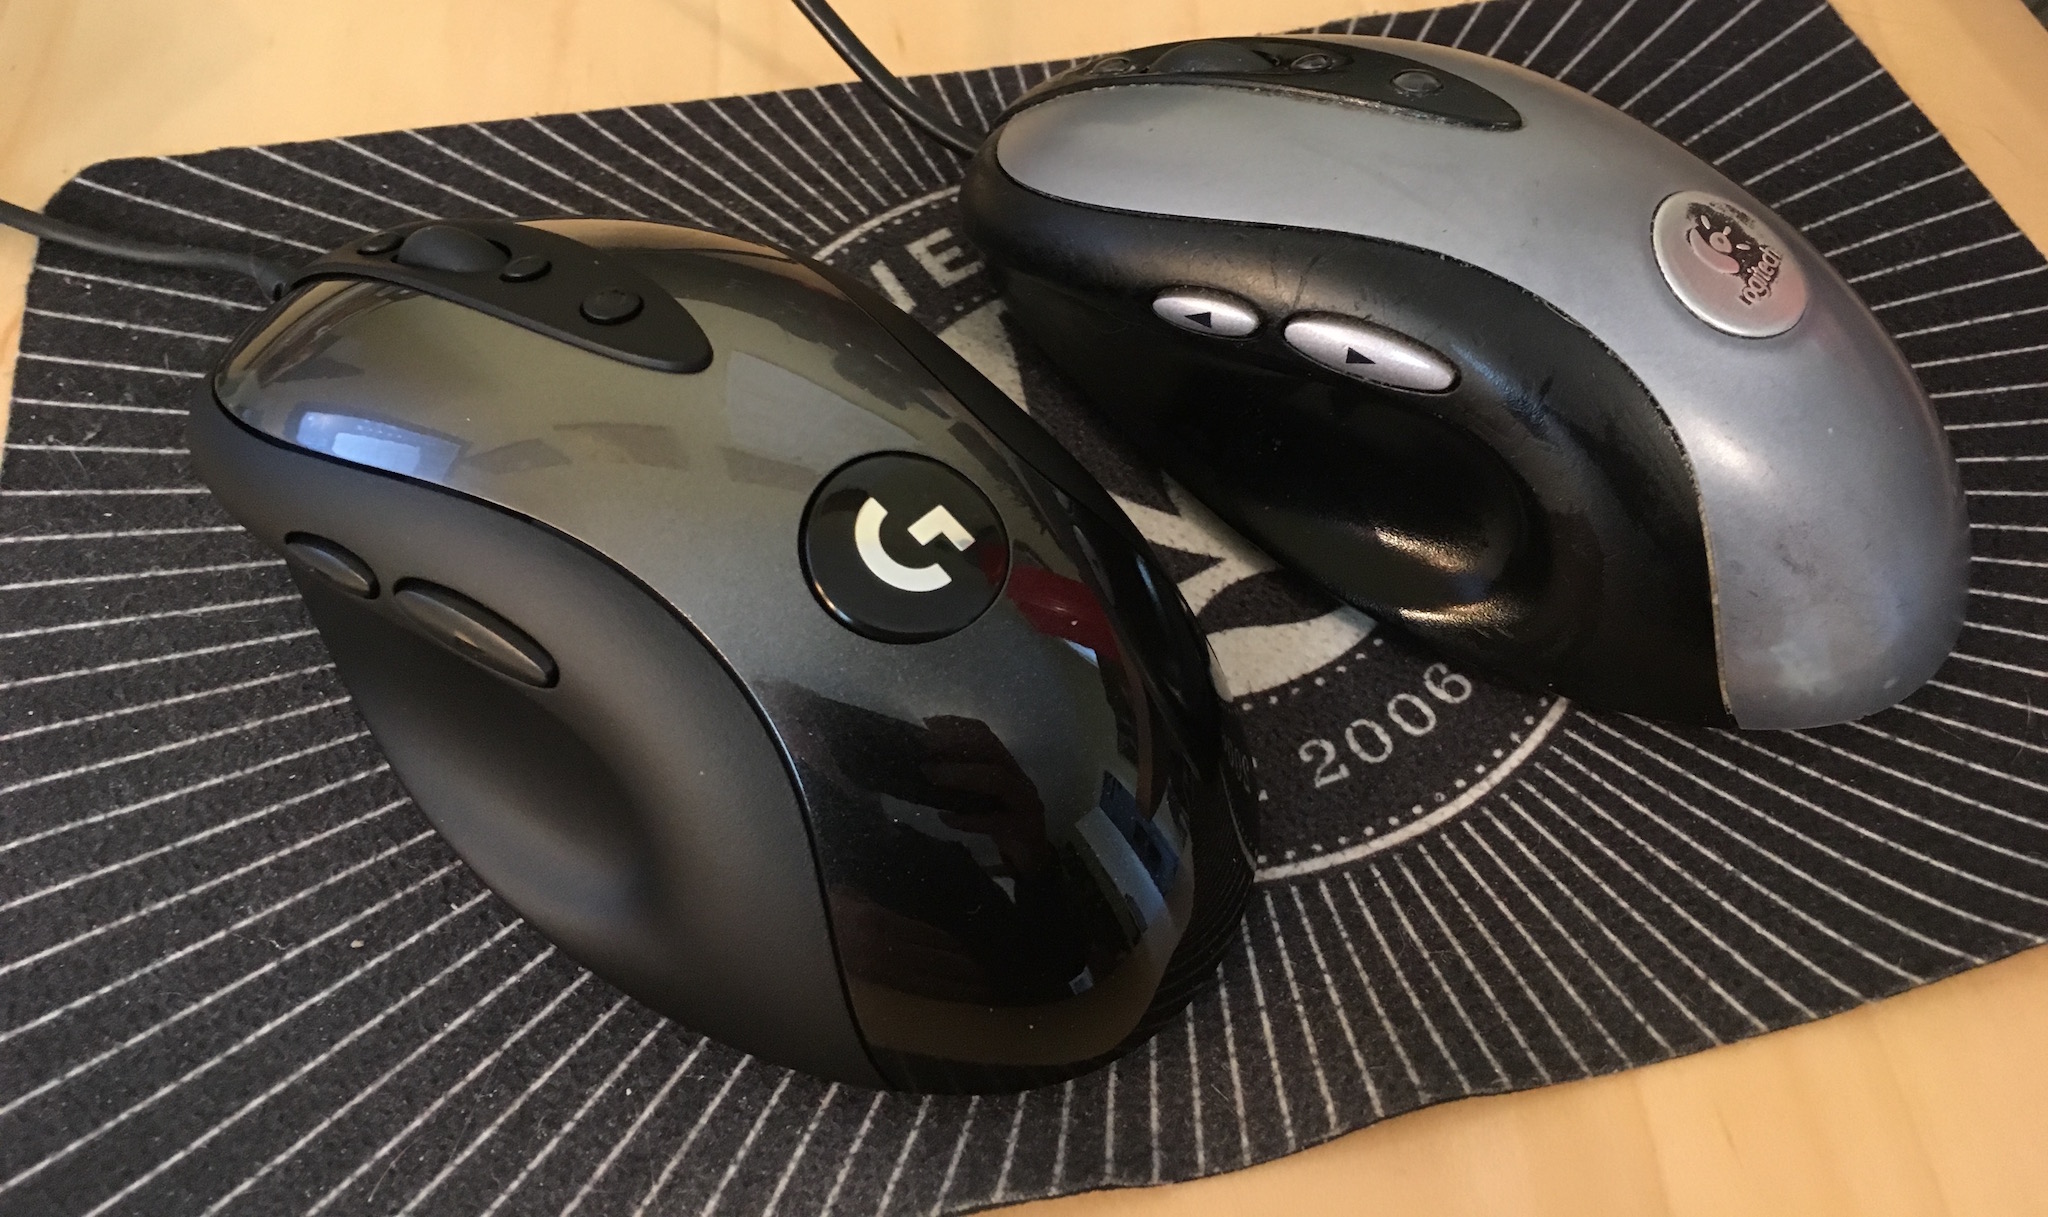
Physically, the MX518 Legendary (as Logitech has branded it) is 95% a match for my old MX500. It’s ever so slightly smaller, just enough that I can tell but not quite enough to be annoying, odd as that may seem. Otherwise, everything feels like it should. The buttons are crisp and clicky, and right where I expect them. And the scroll wheel… well, it works.
The coloration is different — the surface and buttons are all black, as opposed to the MX500’s black-and-silver two-tone styling. While I miss the two-tone a bit, there’s an upgrade: the smooth black top surface has subtle little sparkles embedded in the paint. Shiny!
The changing of the guard
On the other hand, configuring the mouse was a bit of an odyssey. First off, let me make clear that I have a weird setup, even for a grumpy old Mac user. I plug a circa-2000 Macally original iKey 104-key keyboard into my 2013 MacBook Pro. (Yes, you have sensed a trend here: when I find hardware I really like, I hang onto it like a rabid weasel. Ditto software.) The “extra” keys on the Macally like Page Up, Home, and so on don’t get recognized by a lot of current software. Even the Finder can’t read the keyboard’s function keys properly. I’ve restored their functionality with the entirely excellent BetterTouchTool, but it remains that the keyboard is just odd in its ancientness.
Anyway, I first opened System Preferences and then the Logitech Control Center pane. It couldn’t find the MX518 Legendary at all. So next I opened the (separate) Logitech Options pane, which drives the wireless mouse I use when I travel. It too was unable to find the MX518.
Where my paging functions at?
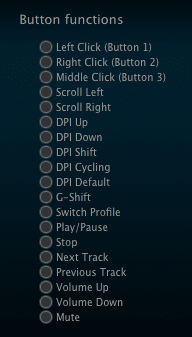
Some Bing-ing led me to a download for Logitech Gaming Software (hereafter LGS), which I installed. That could see the MX518 just fine. Once I stumbled my way into an understanding of LGS’s UI, I set about trying to configure the MX518’s buttons to do what I wanted.
And could not. In the list of predefined mouse actions that could be assigned to the buttons, precisely none of my desires were listed. No ⌘-arrow combos, no page up or down, not even ⌥⇥ to switch apps. I mean, I guess that’s to be expected: it’s sold as a gaming mouse. LGS has plenty of support for on-the-fly-dee-pee-eye switching and copy-paste and all that. Not so much for document editing and code browsing.
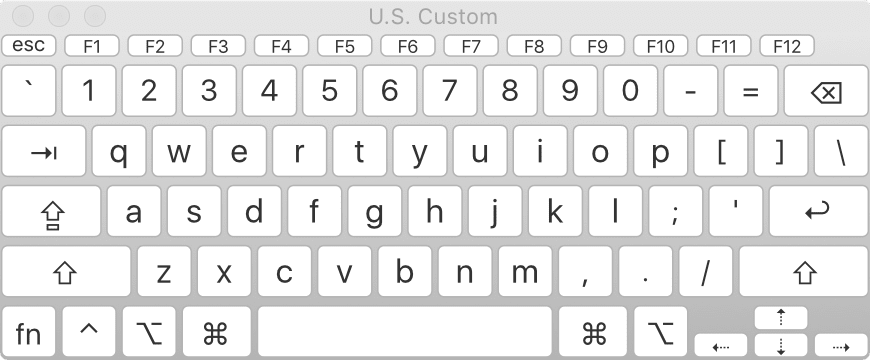
There is a way to assign keyboard combos to buttons, but again, the software could understand precisely none of the combos I wanted to record when I typed them on my Macally. So I went to the MacBook Pro’s built-in keyboard, where I was able to register ⌥⇥, ⌘→, and ⌘←. I could not, however much I tried, register Page Up or Page Down. I pressed Fn, which showed “Fn” in the LGS software, and then pressed the down arrow for Page Down, and as long as I held down both keys, it showed “Page Down”. But as soon as I let go of the down arrow, “Fn” was registered again. No Page Down for me.
Now, recall, this was happening on the laptop’s built-in keyboard. I can’t really blame this one on age of the external Macally. I really think this one might fall on LGS itself; while a 2013 MacBook is old, it’s not that old.
I thought I might be stuck, but I intuited a workaround: I opened the Keyboard Viewer app built into the Finder. With that, I could just click the virtual Page Up and Page Down keys, and LGS registered them without a hiccup. While I was in there, I used it to set the scroll wheel’s middle-button click to trigger Mission Control (F3).
The following key-repeat problem has been fixed and was not the fault of the MX518; see my comment for details on how I resolved it. The one letdown I have is that the buttons don’t appear to repeat keystrokes. So if I hold the button I’ve assigned to Page Down for example, I get exactly one page-down, and that’s it until I release and click the button again. On the MX500, holding down the button assigned to Page Down would just constantly page down until I let go. This was sometimes preferable to scrolling with the scroll wheel, especially for long documents I wanted to very quickly scan for a certain figure or other piece of the page. The same was true for all the buttons: hold it down, and the thing it was configured to do happened repeatedly until you let go.
The MX518 Legendary isn’t doing that. I don’t know if this is an inherent limitation of the mouse, its software, my configuration of it, the interaction of software and operating system, or something else entirely. It’s not an issue forty-nine times out of fifty, but that fiftieth time is annoying.
The other annoyance is one of possibly missed potential. The mouse software has, in keeping with its gaming focus, the ability to set up multiple profiles; that way, you can assign unique actions to the buttons on a per-application basis. I set up a couple of profiles to test it out, but LGS is completely opaque about how to make profiles switch automatically when you switch to an app. I’ll look for an answer online, but it’s annoying that the software promises per-app profiles, and then apparently fails to deliver on that promise.
So after all that, am I happy? Yes. It’s essentially my old mouse, except brand new. My heartfelt thanks to Logitech for bringing this workhorse out of retirement. I look forward to a decade or more with it.
Back in 2015, I wrote about Firefox’s screenshot utility, which used to be a command in the GCLI. Well, the GCLI is gone now, but the coders at Mozilla have brought command-line screenshotting back with :screenshot, currently available in Firefox Nightly and Firefox Dev Edition. It’s available in the Web Console (⌥⌘K or Tools → Web Developer → Console).
An image I captured by typing :screenshot --dpr 0.5 in the Web Console
Once you’re in the Web Console, you can type :sc and then hit Tab to autocomplete :screenshot. From there, everything is the same as I wrote in 2015, with the exception that the --imgur and --chrome options no longer exist. There are plans to add uploading to Firefox Screenshots as a replacement for the old Imgur option, but as of this writing, that’s still in the future.
So the list of :screenshot options as of late August 2018 is:
--clipboard
Copies the image to your OS clipboard for pasting into other programs. Prevents saving to a file unless you use the --file option to force file-writing.
--delay
The time in seconds to wait before taking the screenshot; handy if you want to pop open a menu or invoke a hover state for the screenshot. You can use any number, not just integers.
--dpr
The Device Pixel Ratio (DPR) of the captured image. Values above 1 yield “zoomed-in” images; values below 1 create “zoomed-out“ results. See the original article for more details.
--fullpage
Captures the entire page, not just the portion of the page visible in the browser’s viewport. For unusually long (or wide) pages, this can cause problems like crashing, not capturing all of the page, or just failing to capture anything at all.
--selector
Accepts a CSS selector and captures only that element and its descendants.
--file
When true, forces writing of the captured image to a file, even if --clipboard is also being used. Setting this to false doesn’t seem to have any effect.
--filename
Allows you to set a filename rather than accept the default. Explicitly saying --filename seems to be optional; I find that writing simply :screenshot test yields a file called test.png, without the need to write :screenshot --filename test. YFFMV.
I do have one warning: if you capture an image to a filename like test.png, and then you capture to that same filename, the new image will overwrite the old image. This can bite you if you’re using the up-arrow history scroll to capture images in quick succession, and forget to change the filename for each new capture. If you don’t supply a filename, then the file’s name uses the pattern of your OS screen capture naming; e.g., Screen Shot 2018-08-23 at 16.44.41.png on my machine.
I still use :screenshot to this day, and I’m very happy to see it restored to the browser — thank you, Mozillans! You’re the best.
I said yesterday I would write up the process of adding Grid to meyerweb, and I did. I started it last night and I finished it this morning, and when I was done with the first draft I discovered I’d written almost four thousand words.
So I pitched it to an online magazine, and they accepted, so it should be ready in the next couple of weeks. Probably not long after Chrome ships its Grid implementation into public release, in fact. I’ll certainly share the news when it’s available.
In the meantime, you can inspect live grids for yourself, whether here or at Grid by Example or The Experimental Layout Lab of Jen Simmons or wherever else. All you need is Firefox 52, though Firefox Nightly is recommended for reasons I’ll get to in a bit.
In Firefox 52, if you inspect an element that has display: grid assigned to it, you’ll get a little waffle icon in the inspector, like so:
Mmmmmm, waffles.
Click it, and Firefox will draw the grid lines on the page for you in a lovely shade of purple. It will even fill in grid gaps (which are a thing) with a crosshatch-y pattern. It’s a quick way to visualize what the grid’s template values are creating.
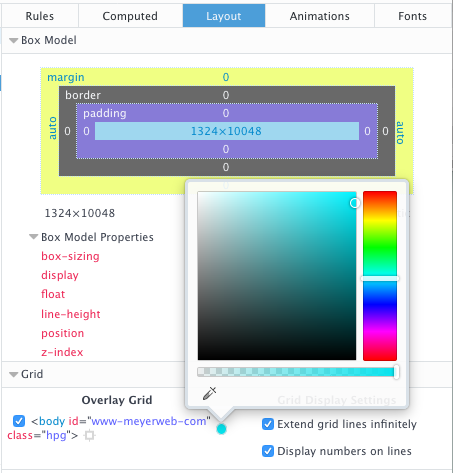
If you have Firefox Nightly, there’s an even more powerful tool at your disposal. First, go into the inspector’s settings, and make sure “Enable layout panel” is checked. You may or may not have to restart the browser at this point — I did, but YEMV — but once it’s up and running, there will be a “Layout” panel to go with the other panels on the right side of the Inspector. There you get the box model stuff, as well as a checklist of grids on the current page.
The Layout panel
For each grid on the page — not just the element you’re inspecting — you can set your own color for the gridlines, though those color choices do not currently persist, even across page reloads. You can also turn on number labels for the grid lines, which are currently tiny and black no matter what you do. And if you allow grid lines to extend into infinity, you can turn the page into a blizzard of multicolored lines, assuming there are several grids present.
This panel is very much in its infancy, so we can expect future enhancements. Things like color persistence and better grid line labels are already on the to-do list, I’m told, as well as several more ambitious features. Even as it is, I find it valuable in constructing new grids and diagnosing the situation when things go sideways. (Occasionally, literally sideways: I was playing with writing-mode in grid contexts today.)
There’s another, possibly simpler, way to enable the Layout panel, which I learned about courtesy Andrei Petcu. You type about:config into the URL bar, then enter layoutview into the search field. Double-click “devtools.layoutview.enabled” to set it to “true”, and it will be ready to go. Thanks, Andrei!
Yesterday, I was looking at an existing page, wondering if it would be improved by rearranging some of the elements. I was about to fire up the git engine (spawn a branch, check it out, do edits, preview them, commit changes, etc., etc.) when I got a weird thought: could I just drag elements around in the Web Inspector in my browser of choice, Firefox Nightly, so as to quickly try out various changes without having to open an editor? Turns out the answer is yes, as demonstrated in this video!
Youtube: “Dragging elements in Firefox Nightly’s Web Inspector”
Since I recorded the video, I’ve learned that this same capability exists in public-release Firefox, and has been in Chrome for a while. It’s probably been in Firefox for a while, too. What I was surprised to find was how many other people were similarly surprised that this is possible, which is why I made the video. It’s probably easier to understand to video if it’s full screen, or at least expanded, but I think the basic idea gets across even in small-screen format. Share and enjoy!
Throughout 2015, a few people who’ve seen me present “Designing for Crisis” at An Event Apart have noticed that, on the slides where I have filler text, it’s a localized variant. In Washington, DC, for example, one section started out:
Andrew ellicott lobortis decima thomas jefferson vulputate dynamicus fiant kingman park sollemnes ford’s theater. Vero videntur modo claritatem possim quis quod est noma howard university consequat diam. Blandit ut claram north michigan park seacula judiciary square william jefferson clinton hawthorne millard fillmore iis…
This was a product of some simple PHP I’d originally written to generate Cleveland-themed filler text a year or so back, which you can find at localipsum.meyerweb.com, and which I’d expanded upon to let me generate text for my presentations at AEA. The name comes from the original idea I had, which was to provide a list of cities/regions/whatever, so that users could pick one and generate some filler text. That never quite came together. I had a semi-working version once, but the UI was horrible and the file management was worse and I got discouraged and rolled back to what you see now.
I kept telling myself that I’d get back to it, do the city-selection thing right, polish it nicely, and then finally release the source. I’ve told myself that all year, as I manually swapped in city information to generate the filler text for each of my talks. Now I’ve finally admitted to myself that it isn’t going to happen, so: here’s the source. I chose a pretty permissive license — BSD-ISC, if I recall correctly — so feel free to make use of it for your own filler text. I’ll be happy to accept pull requests with improvements, but not package-management or complete MVC restructuring. Sorry.
I know, it’s a goofy little thing and the code is probably pants, but I kinda like it and figure maybe someone out there will too. If nothing else, we can look for a few laughs in the output and maybe — just maybe — learn a little something about ourselves along the way.
(P.S. Speaking of “Designing for Crisis”, look for a post about that, and more specifically video of it, in the next few weeks.)